HandwerkerPro, an innovative software company, specializes in developing CRM solutions for small and medium-sized craft businesses. Their cloud-based software CraftManager helps installers, painters, electricians, and other tradespeople manage customer relationships, create quotes, schedule jobs, and write invoices – all in one place, even on the go from the construction site.
The core product is mature and very well received. HandwerkerPro regularly gains new customers who want to start using CraftManager. But this is exactly where the big challenge is: Onboarding new customers is always time-consuming, complex, and not standardized.

Every new customer comes with different needs: some want to import their existing clients from Excel, others are already using an old system they need to migrate data from. Some require intensive training for their whole team; others are tech-savvy and pick things up quickly. Some companies want custom quote and invoice templates, while others are fine with the standard templates.
For the HandwerkerPro team, each onboarding means a lot of coordination. There are tons of recurring steps – from the initial kickoff meeting, technical system setup, data migration, creating custom templates, all the way to training and go-live support. Since every onboarding is different, employees often forget important steps, delays happen, and the customer waits longer than needed for everything to go live. Plus, there’s no reliable way to calculate how much effort a typical onboarding really takes.
To solve these challenges, HandwerkerPro decided to create a standardized project component for customer onboarding. This component should:
Structure the entire onboarding process clearly and use it as a template
Speed up and simplify project planning for each new onboarding
Document all necessary work steps in a way that everyone can understand so no one forgets important tasks
Be flexible enough to meet individual customer needs
Make realistic effort estimates so resources can be planned better
Use learnings from past onboardings purposefully to keep improving the process
In this workshop, we'll work out the structure and content of this project component. Together, we'll define:
Which recurring subtasks the CRM onboarding includes
What dependencies and sequences exist between the tasks
What information, checklists, and data points are needed to manage the project
How to design the component so it can flexibly respond to different customer situations
How we'll use conditions to make sure only the really needed work packages become visible
At the end of the workshop, there should be an initial draft of the project component, which can be used as a template for all future CRM onboardings in HandwerkerPro's planning system.

Sarah Bergmann gathered the team in the meeting room. The team is sitting at the big meeting table. Sarah Bergmann is leading the discussion, Michael König has Leadtime open on the screen, which is projected onto the large monitor. Coffee cups are on the table, notepads are ready.
Sarah Bergmann (Managing Director): initiator of the workshop, strategic overview of customer acquisition and onboarding quality.
Tim Weber (Customer Success Manager): mainly responsible for looking after new customers during onboarding, coordinates the whole project process.
Lisa Hoffmann (Implementation Specialist): responsible for technical system setup, data migration and configuration of the CRM system.
Daniel Krause (Training Lead): runs user trainings and creates training materials for customers.
Julia Neumann (Support Specialist): Supports customers during the Go-Live phase and with technical questions after implementation.
Michael König (Senior Project Manager): Leadtime specialist, guides the workshop and manages the implementation of the project component in parallel to the discussion.
Sarah Bergmann: "Alright, let's get started. Our first goal is to define the main topics, the so-called epics. These are the main blocks of our onboarding process that everything is based on. Every epic stands for a clearly defined area that kind of acts as a red thread throughout the whole project."
Tim Weber: "So these are basically the main chapters, so we don't end up with a hundred single tasks again, right?"
Sarah: "Exactly. These epics help us to clearly structure the onboarding. If we define them well today, we'll save ourselves a lot of chaos with every new customer. Michael, you have Leadtime open, right?"
Michael König: "Yep, ready. I'm creating the epics live as we go."
Sarah: “Awesome. So let's jot down the big topics – what are the big issues that always take time and nerves during onboarding?”
Tim: “Definitely the initial kickoff with the client. That's where we clarify expectations, goals, and who has which role on their side. That's always the first big step.”
Sarah: “Yeah, that's definitely its own epic. Michael, please set it up as ‘Project Kickoff’.”
(Michael starts typing and creates “Project Kickoff” as an epic.)
Lisa Hoffmann: “Data migration and system configuration – that's the core for us. Importing customer data, adjusting fields, configuring workflows, setting up email templates. That often takes the longest.”
Sarah: “For sure. I would call that ‘System Setup & Data Migration’. Michael?”
(Michael creates “System Setup & Data Migration” as an epic.)
Daniel Krause: “Training sessions. User training is essential if the client is really going to use the system. We need to plan who’s getting trained, what topics, how many sessions.”
Sarah: "Exactly, 'user training' as its own epic. Michael, please add it."
(Michael sets up "user training" as an epic.)
Julia Neumann: "Go-live support. So, the phase when the system actually goes live. We need to be close by, so no one panics if something doesn't work or questions pop up."
Sarah: "True, 'Go-live & support' fits well there. Michael, please add it."
(Michael sets up "Go-live & support" as an epic.)
Sarah: "So we already have four main areas: project kickoff, system setup & data migration, user training, go-live & support. Are we missing anything?"
(The team thinks for a moment.)
Tim: "Maybe an epic for preparation? Like before we kickoff with the customer—internal alignment, setting up the project, checking off checklists?"
Sarah: "Good point. Then let's add 'Project preparation internal' and put that right at the start. Michael?"
(Michael creates 'Project preparation internal' as an Epic and moves it to the first position.)
Sarah: "Okay, so now we have: Project preparation internal, Project kickoff, System setup & data migration, User training, Go-live & support. The order also matches the typical flow. Before we go on, there's one more important thing: There are always things that are so big they pretty much become their own subprojects. In those cases it can make sense to not just make an Epic, but to create a separate component–so, like, a separate building block that we can reuse every time."
Lisa: "Yeah, creating custom quote templates comes to my mind right away. Some customers want their quotes completely customized—with their own logo, their own text blocks, special fields. That's a huge operation every time."
Sarah: "Exactly, that's a good example. We don't do that kind of template creation for every customer, but when we do, it's set up pretty much the same way every time. That's the perfect candidate for its own component."
Michael: "So not as an Epic, but set it up as a separate component, right?"
Sarah: "Right. Michael, please set that up for ‘Create custom offer template’. That way, we can add in the typical steps like briefing, design draft, feedback rounds, and technical implementation – and next time, we’ll just use it again.”
(Michael creates the component “Create custom offer template”.)
Sarah: "Great. That gives us the big lines: a ‘CRM onboarding’ component with 5 epics for the main areas. Plus, a second component for creating custom templates. We’ll leave those empty for now, since that would take us too far today. Today, we’re just focusing on the onboarding piece.”
Tim: "That’s already bringing in a bit of structure.”
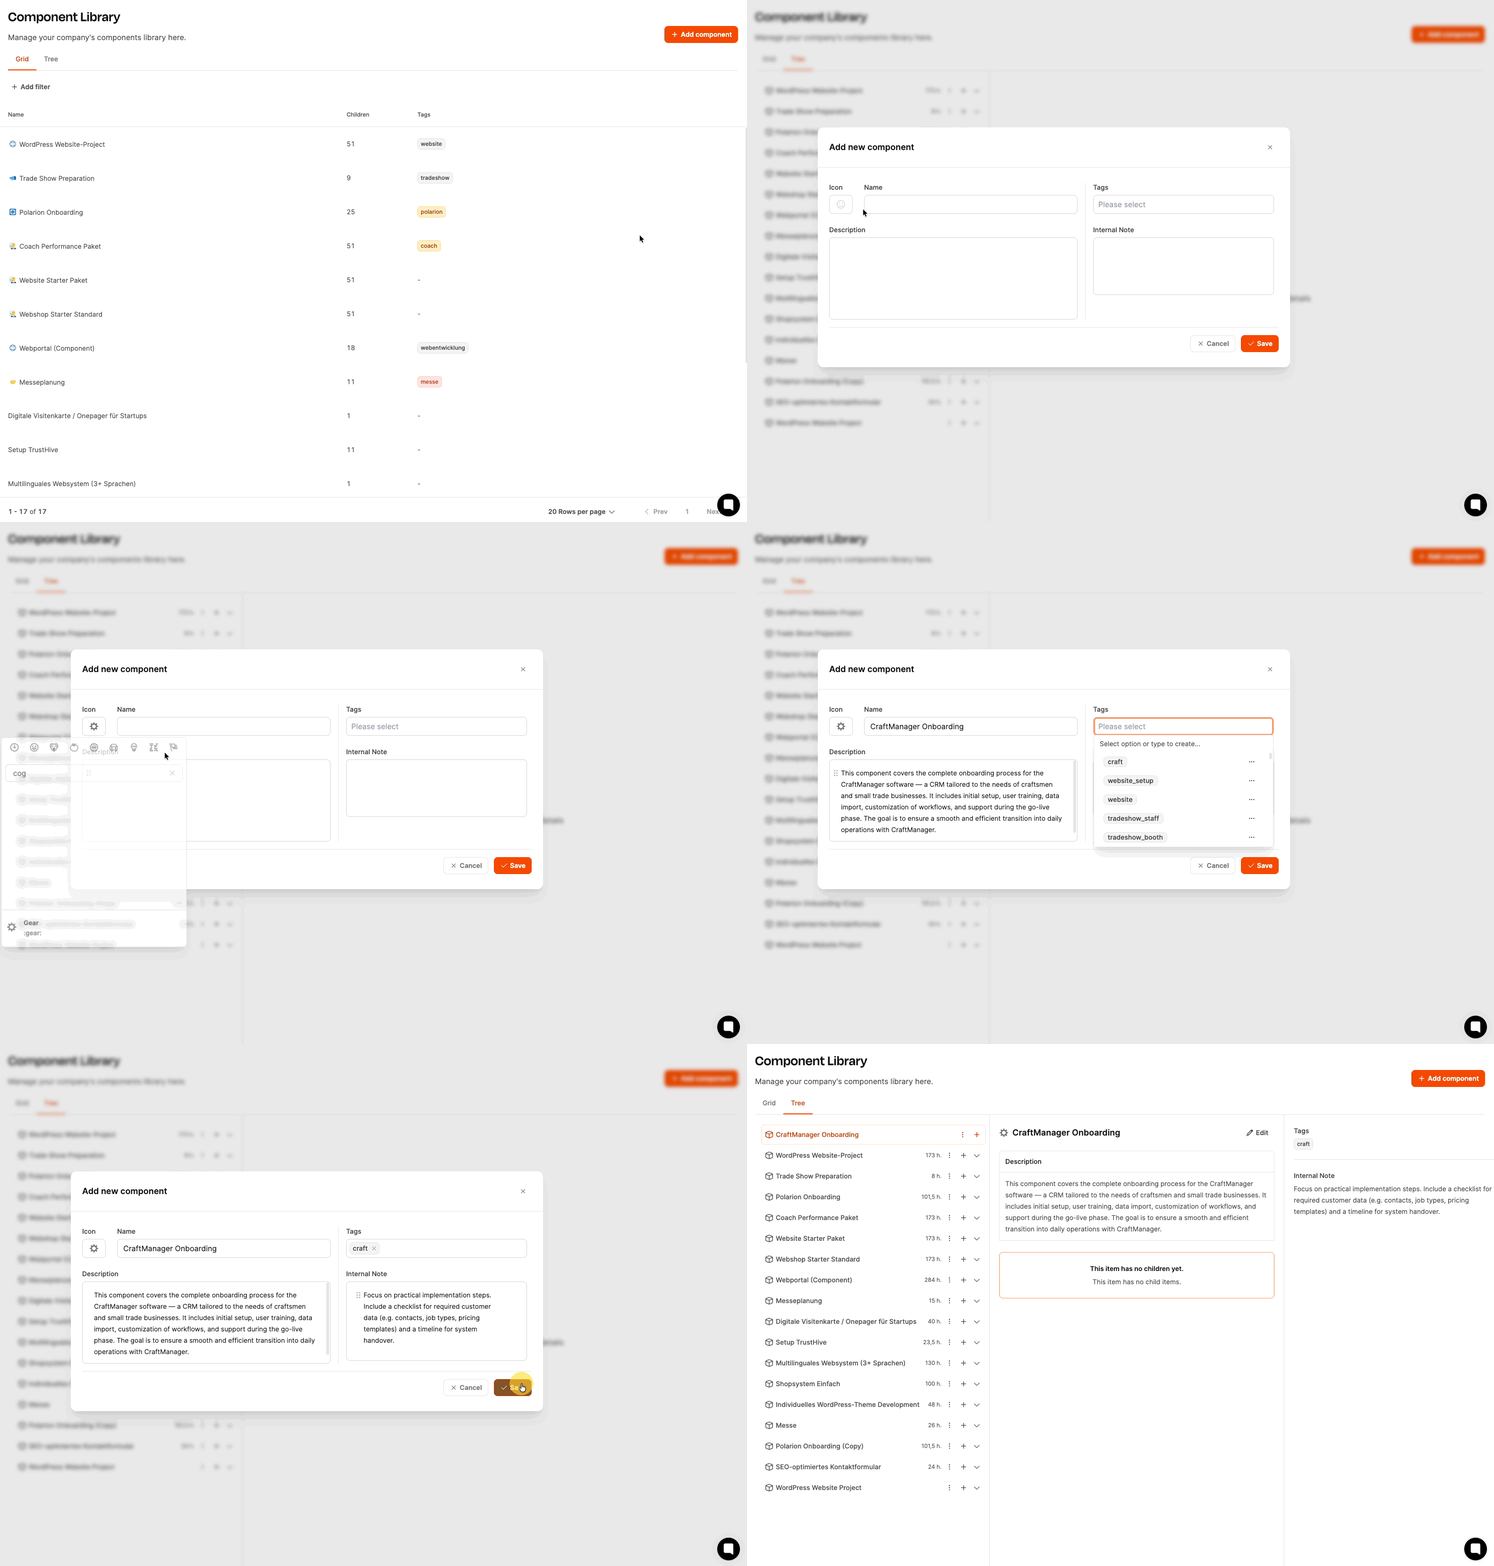
Go to Administration → Component Library in the left menu.
Click Add Component in the top right.
A dialog will pop up. Fill in the following fields:
Icon: Choose a fitting icon to make it easier to identify your component at a glance (for example, a gear symbol for “Onboarding”).
Name: Give your component a clear name, e.g. “CRM-Onboarding”.
Description: Briefly describe what this component is for. For example: “Standardized process for onboarding new CRM customers. Covers everything from project prep to go-live support.”
Tags: Tags make it easier to link tickets later. Tip: Use a simple version of your component name as the tag, e.g. “onboarding”.
Internal Note: Leave any internal notes or instructions here for people who’ll be using this component later. For example: “This component is used for all new client projects. Be sure to run the kickoff meeting before the project starts and fill out every form field carefully.”
Click Save.
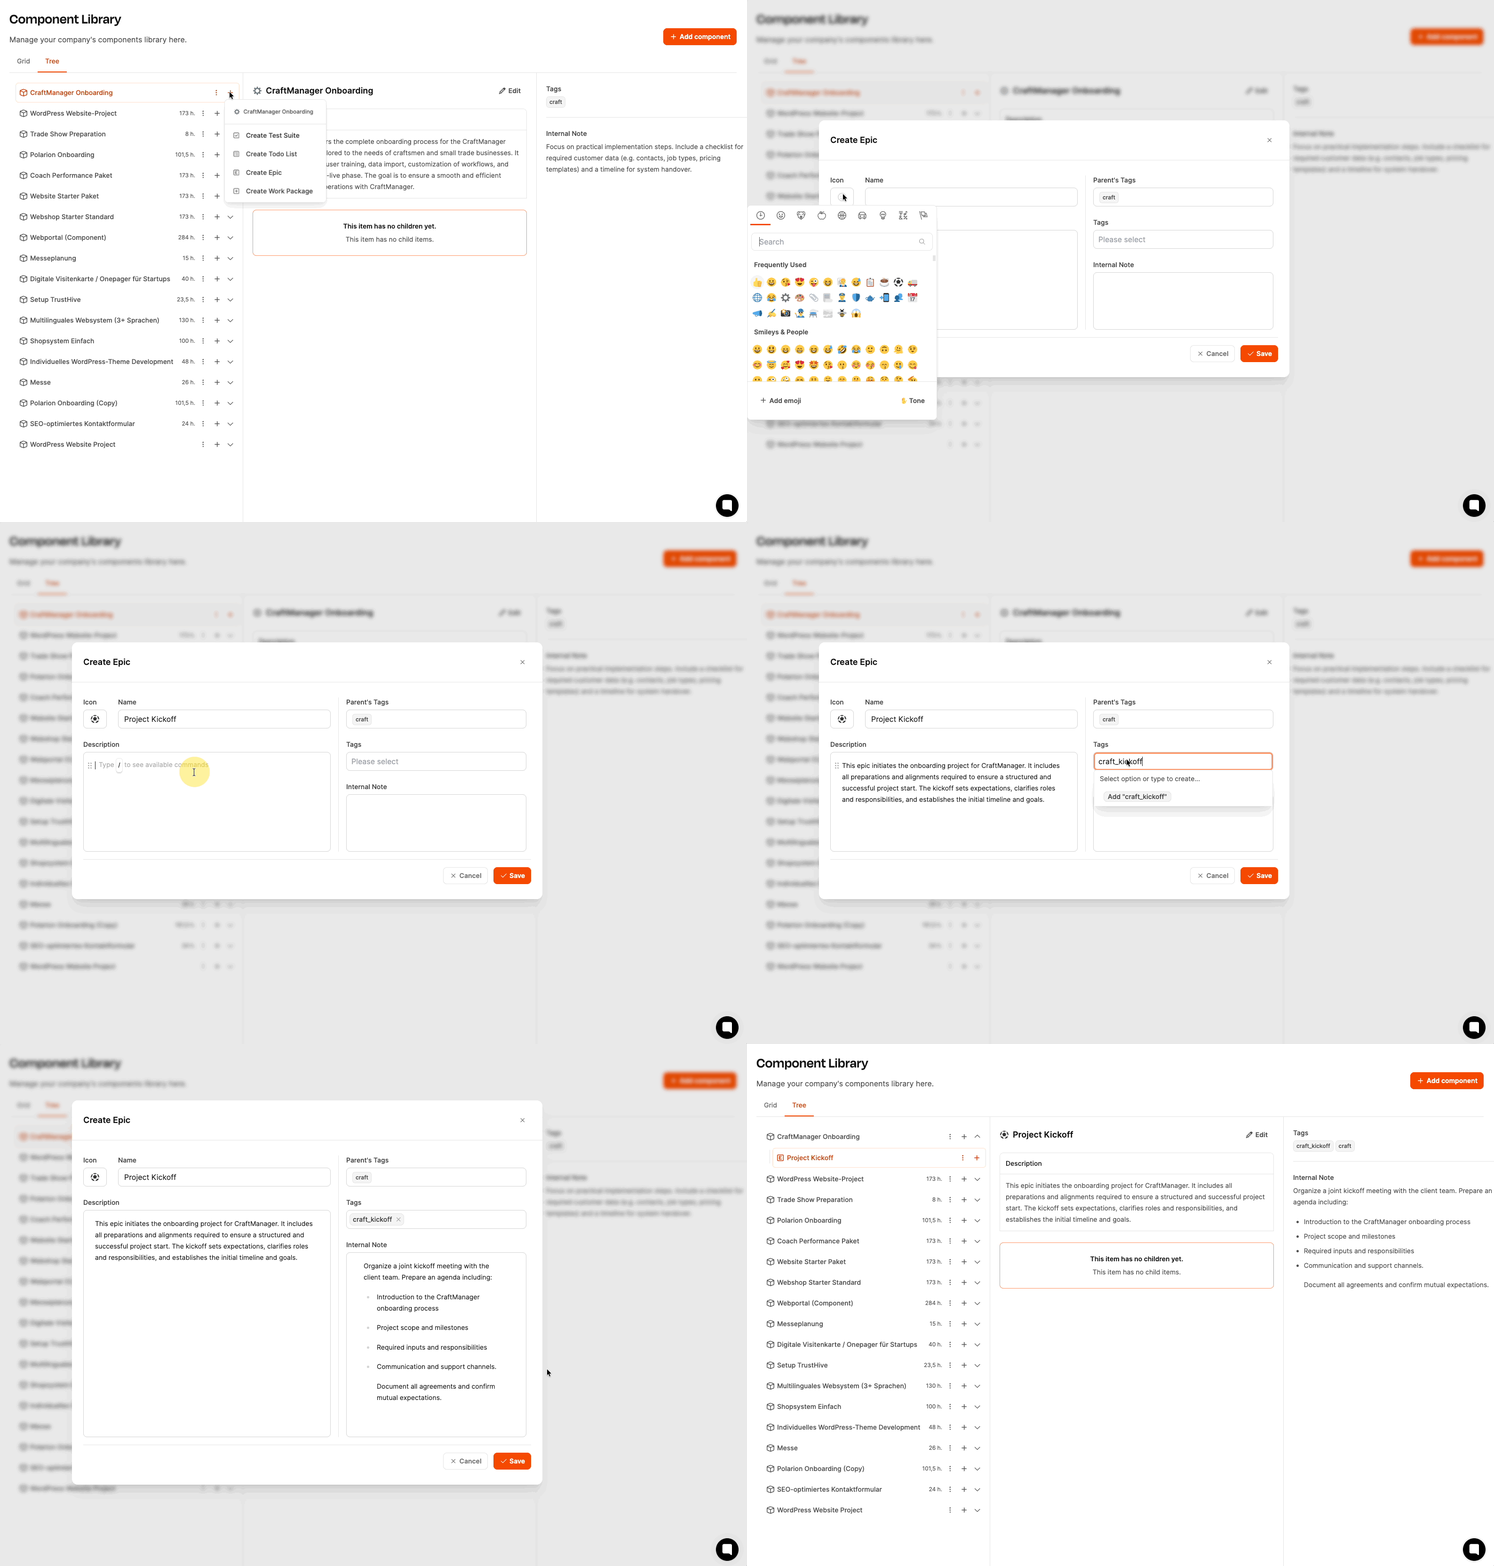
Select the newly created component "CRM-Onboarding" from the overview.
Switch to the tree view (default view for further work).
Click the plus icon next to the component name to add building blocks to the component.
Select Create Epic from the context menu.
Fill in the fields:
Icon: Optional, for better visual distinction (e.g. a calendar icon for "Project Kickoff").
Name: Name for the workspace or phase, e.g. "Internal project preparation."
Description: Explain the content, the WHAT of the epic. For example: "Internal preparation of the onboarding project before the customer gets involved. Includes project setup, internal coordination and checklist preparation."
Tags: Use a tag that will later also apply to all related work packages, checklists or tests, e.g. "onboarding_preparation".
Internal note: Enter an implementation note for the team that will work on this epic later. Here, it's about describing the HOW. For example: "Please make sure all internal resources (implementation specialist, training lead) are scheduled for the project before the kickoff takes place."
Save the epic.
Repeat steps 3–6 for the other epics:
"Project Kickoff"
"System setup & data migration"
"User training"
"Go-live & support"
The building blocks of project components
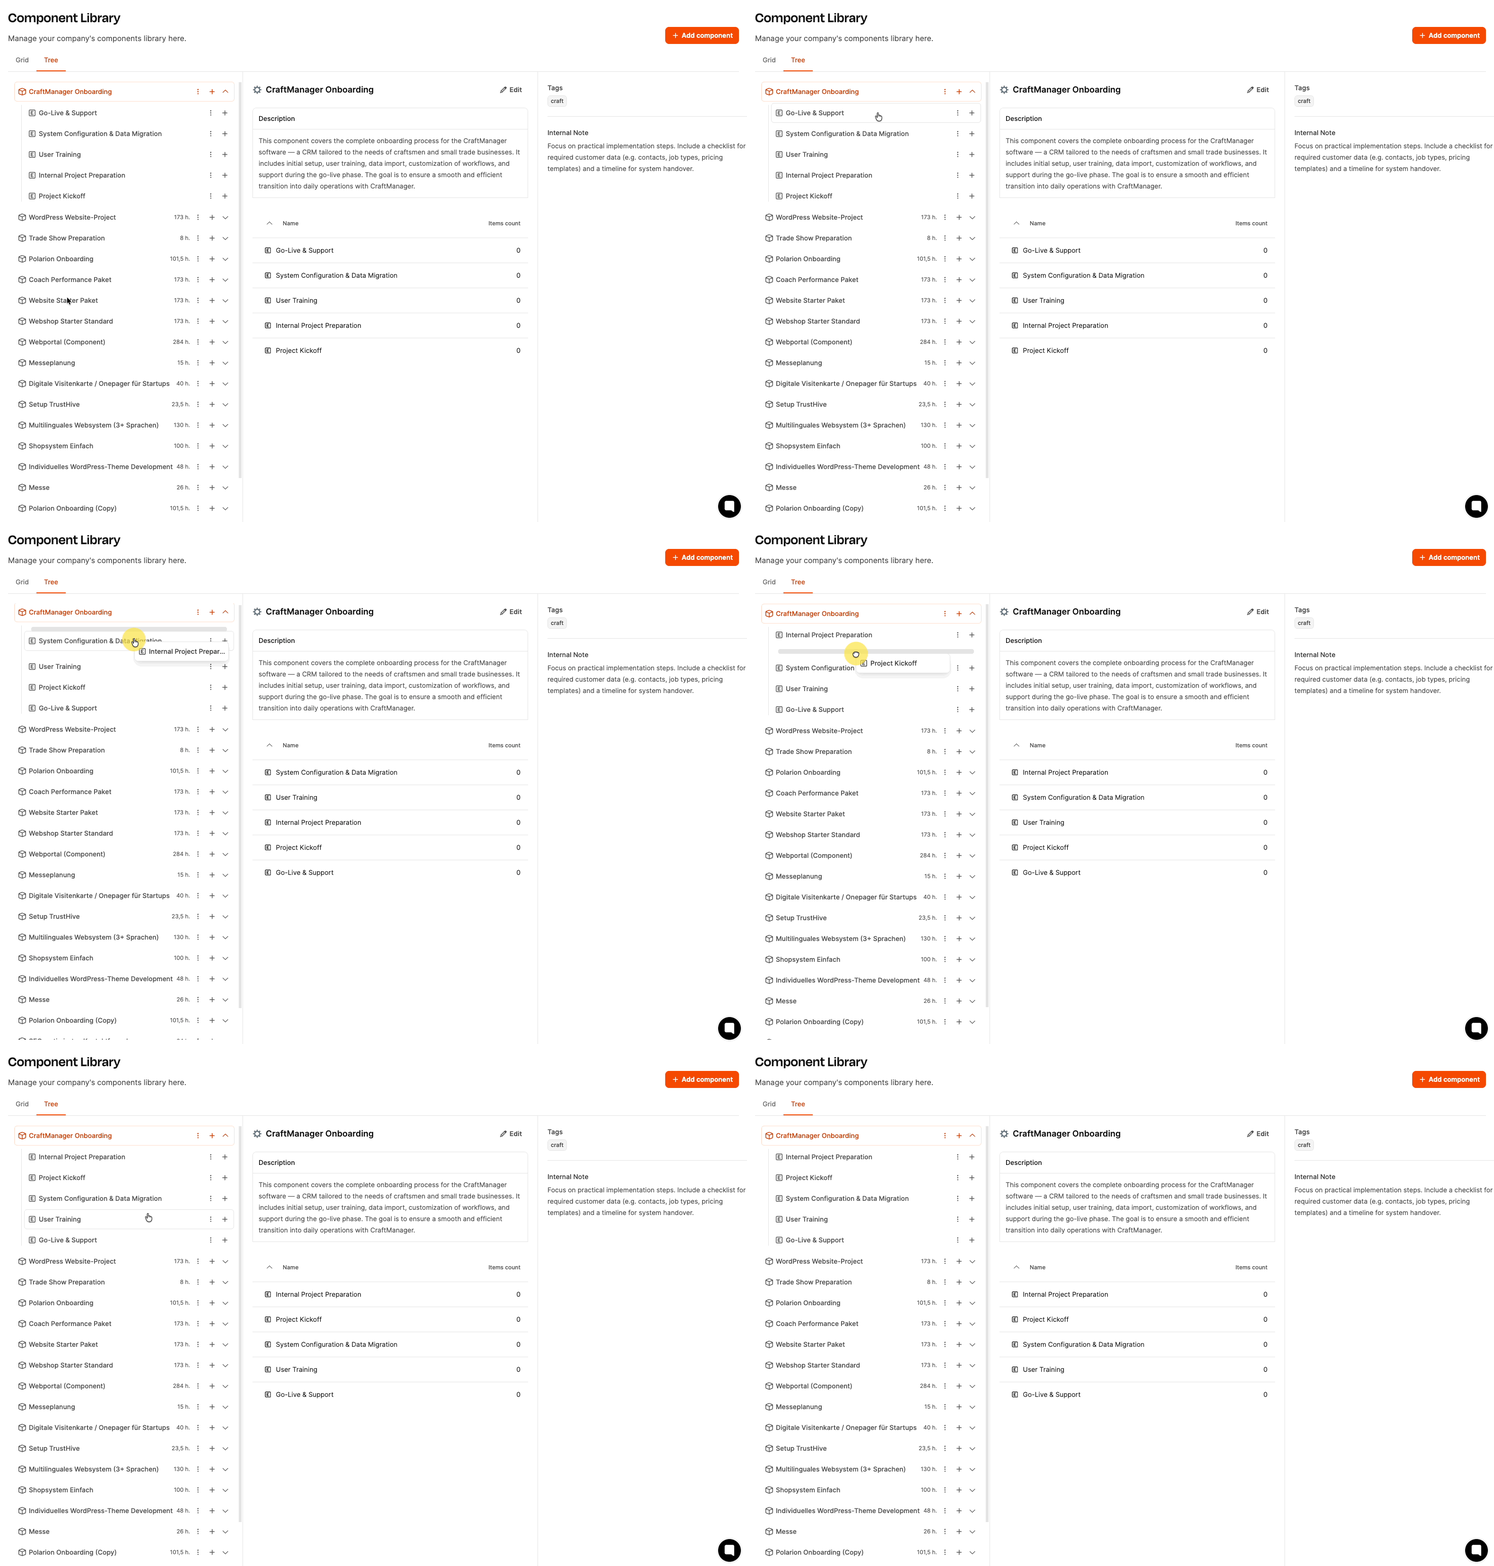
You can rearrange the Epics and, later on, other building blocks by drag & drop in the tree view. Just make sure to set up the order so it matches the real project flow:
Internal project prep
Project kickoff
System setup & data migration
User training
Go-live & support
If you already decided in your meeting that you'll need more components (for example, "create custom offer template"), just add them right away following the same pattern:
Go back to the component library.
Click on Add component.
Fill out the fields in the same way and save the component.
That finishes phase one — the structure of the component is there, and the first epics are set up. Up next: work packages, checklists, and tests.
The team keeps going. Now it’s time to work out the concrete work packages for the “internal project prep” epic. Everyone’s feeling productive and focused. Michael projects the lead time input window for work packages onto the wall.
Sarah: “Alright, so now we’re going through each of the work packages. We already talked about some first ideas last time — today it’s all about actually creating the packages. And this time we’re making sure we fill out every field properly. We need the info not just to do the work, but also for our planning and budgeting.”
Michael: "I'll explain this again real quick, so we're all on the same page. For every work package, you need to fill in the fields here:
Description: Here you write down WHAT should be done in this package – meaning the actual task.
Tags: The tags from the epic are inherited automatically. I've given the whole component the tag 'onboarding' and the first epic the tag 'onboarding_vorbereitung'. These tags get passed on to all elements inside the epic. Later, when we turn these work packages into tickets, it’ll give us extra overview. On the work package level, you don’t have to add another tag, but it can make sense in special cases.
Internal note: This is often the part that gets forgotten. Please explain the HOW here – so, instructions for the person who'll be working on the package later. When someone gets the package, they should instantly know how to approach the task, without having to ask.
Minimum effort: And this is really important now..."
Sarah: "Exactly, the minimum effort! I want you to put in an estimate for every work package, how many hours you’ll need to get it done. We need these estimates for two things:
So I can budget the project better beforehand – like, how much work is coming up in total.
So later in controlling, we can see whether we stayed on track or if anything went wrong."
Tim: "So, does that mean we’re now roughly estimating the hours for every work package?"
Sarah: "Yeah, it doesn’t have to be rocket science. Better to estimate too much than too little. If you think ‘Set up project in Leadtime’ takes an hour, just put down one hour. If it turns out to be only 30 minutes, that’s fine too. But we need a baseline."
Lisa: "And what if we can’t really estimate a package?"
Sarah: "Then it’s better to set too much rather than too little. And if in doubt, we’ll just ask someone who’s done it before."
Michael: "So in summary:
Description = WHAT needs to be done
Tags are for structure
Internal note = HOW to tackle the topic
Minimum effort = How many hours this step will take
Can we do this?"
Team (nods approvingly): "Yeah!"
Sarah: "Alright, let's go. We'll tackle each of the work packages one by one now."
Tim: "So that means, we set up the new client project in Leadtime, add in the onboarding component and add the team members involved. I'd say, with all the settings, that'll take about an hour."
Michael: "Okay, I'll make a note of that:
Description: Set up the new client project in Leadtime, upload the onboarding component and add the responsible team members.
Tags are already there.
Internal note: Please make sure that the 'CRM-Onboarding' component is uploaded. All team members (Customer Success, Implementation, Training, Support) need to be added as project members.
Minimum effort: 1 hour."
Sarah: "Perfect, let’s move on."
Lisa: "Check client data ahead of time. Before we kick things off, I should take a look at the data the client sent us—Excel spreadsheets, CSV files or whatever they have. I need to see if the data is clean, what fields are there, if there are any duplicates. Depending on how much data there is, it can take longer or shorter, but on average I'd say about three hours."
Michael: “Okay, I'll write:
Description: Check of the inventory data provided by the customer (Excel, CSV, etc.) for completeness, data quality, and structure.
Tags are there.
Internal note: Please check for duplicates, missing required fields and inconsistent formatting. If there are problems before kickoff, check in with the customer.
Minimum effort: 3 hours.”
Sarah: “Great, next.”
Tim: “Prepare kickoff meeting. I have to create the agenda, invite all participants, collect documents – presentation, checklist, questionnaire. I'd say, two hours.”
Michael: “So:
Description: Preparation of the kickoff meeting with the customer – create agenda, invite participants, put together presentation and documents.
Tags are there.
Internal note: Agenda should cover the following points: project goals, timeline, responsibilities, data migration, training needs. Use the presentation and questionnaire from the templates folder.
Minimum effort: 2 hours.”
Sarah: “Great, now we've got all the main prep topics in there. But I noticed something else: we should also have a checklist for the internal coordination—just to make sure everyone on the team is on the same page before we kick off with the client.”
Julia: “True, during the kickoff we already noticed that it still wasn't clear internally who was doing what.”
Sarah: “That's why I'm suggesting: let's set up a checklist with the key points that have to be clear internally. Michael, can you set that up?”
Michael: “Sure, there's actually a special work package just for this called 'Checklist'. It's kind of like a ticket, only it has lots of little tasks in it that need to get done. I'll set it up now:
Description: Internal coordination before customer contact.
Tags are here.
Internal note: List of the most important points to clarify before kickoff – please go through completely and check off.
Minimum effort: 1 hour.”
Sarah: “Perfect. I’d move the checklist all the way to the top now, because we want to take care of it before all the other packages. Like that.”
(Michael moves the checklist to the first position via drag & drop.)
Sarah: “That means we have our first epic. Well done!”
After the basic structure of the component was set up in the first phase, now it’s about creating the actual work packages and checklists within the first epic “Project preparation internal”.
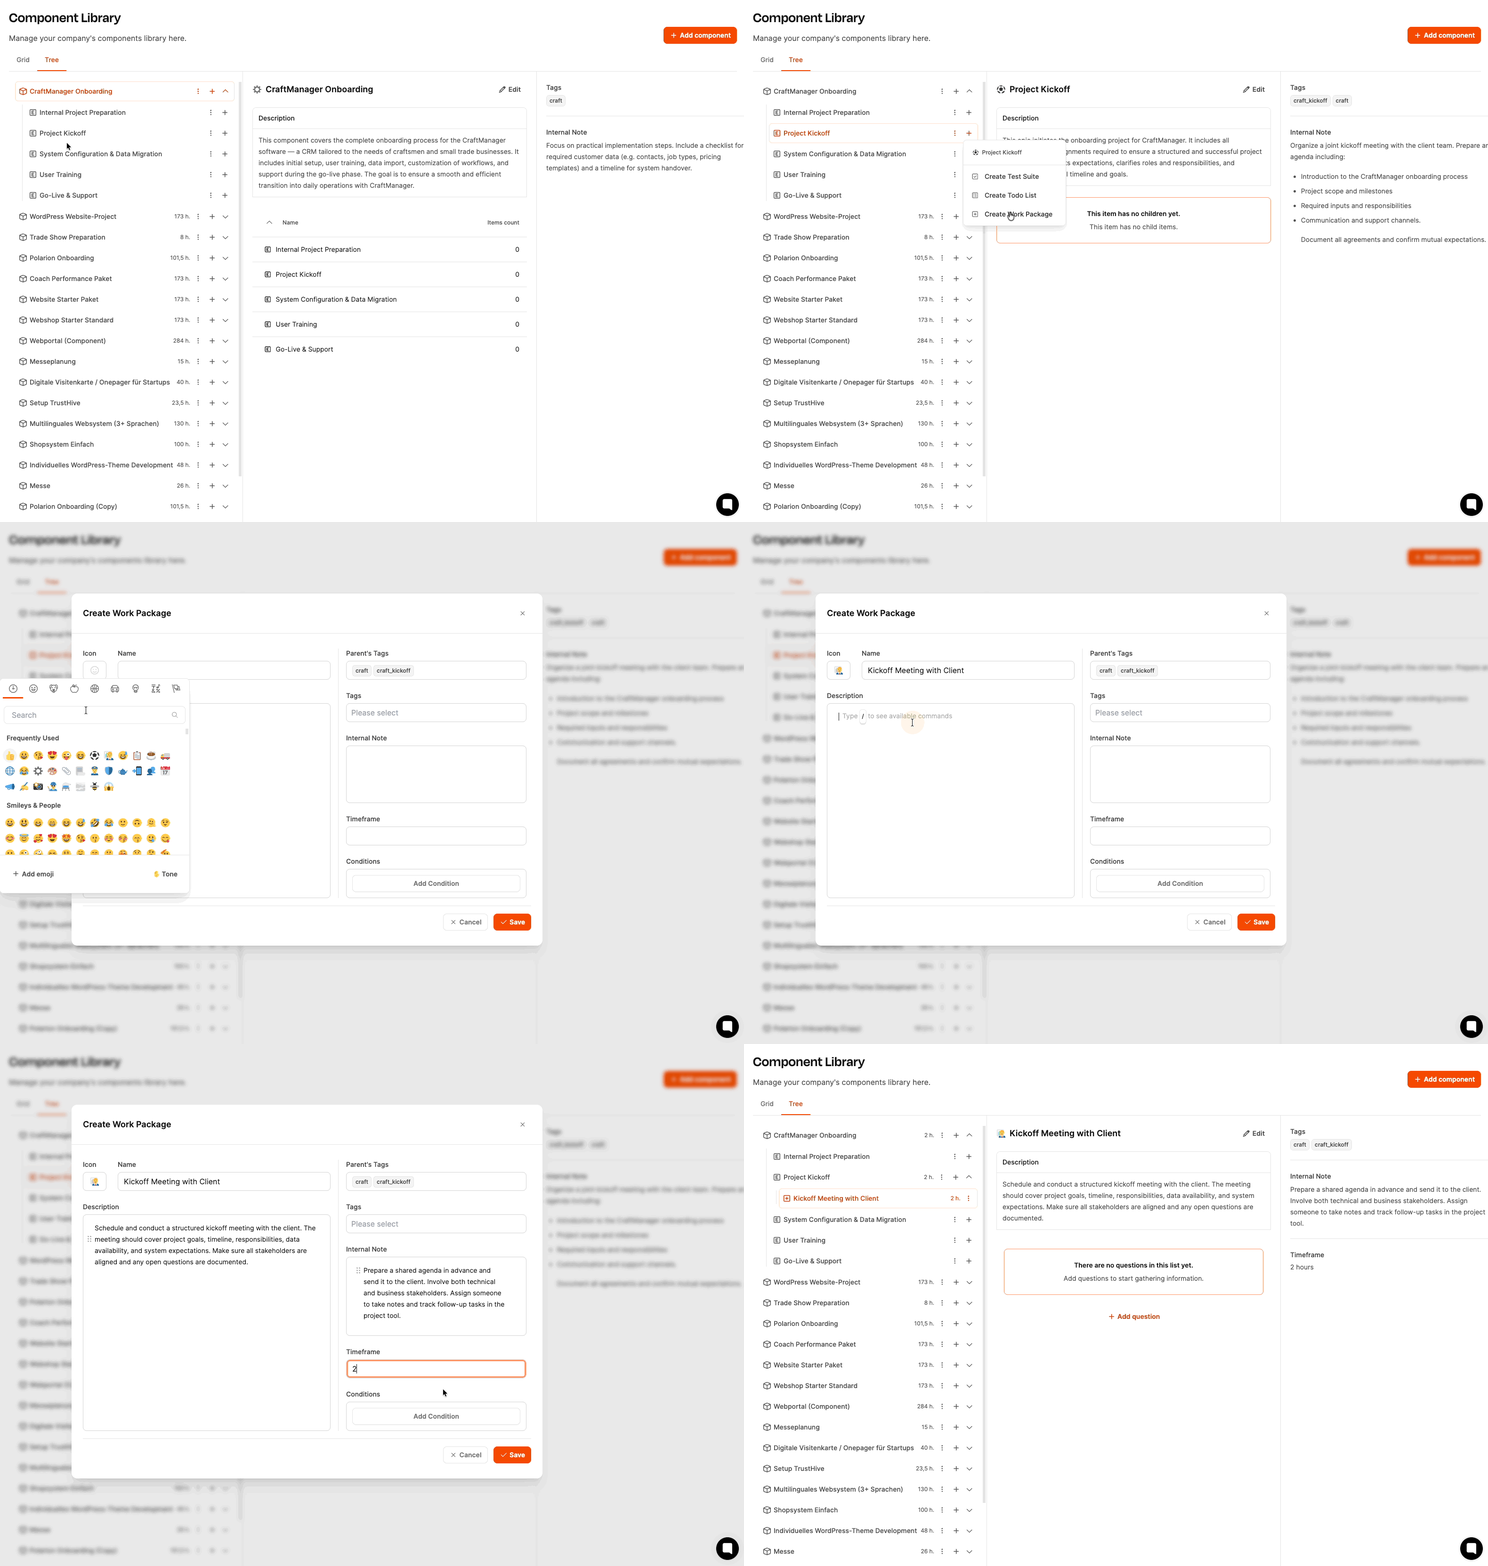
In the tree view of the component click the plus icon in the row “Projektvorbereitung intern".
A context menu will open with three options:
Create acceptance test
Create checklist
Create work package
Select “Create work package".
A dialog window opens with the following fields:
Icon:
Name: Title of the work package, e.g. “Projekt in Leadtime anlegen".
Description: Explanation of the task, e.g. “Create the new customer project in Leadtime, load the onboarding component and add the responsible team members."
Tags: Optional, but will be automatically inherited from the epic and the component.
Internal note: Hints for execution, e.g. “Please make sure the component 'CRM-Onboarding' is loaded. All team members (Customer Success, Implementation, Training, Support) need to be added as project members."
Minimum effort: Estimated minimum time in hours, e.g. “1".
Click “Save"
The building blocks of project components
Just like with the first task, add more work packages:
"Check customer data in advance" (Fill in description and minimum effort as needed)
"Prepare kickoff meeting"
Repeat steps 1–5 for every work package.
In the same context menu (plus sign on the Epic) "Create checklist" select.
Define title and description of the checklist, e.g.:
Name: "Internal alignment before kickoff"
Description: "Internal alignment before meeting with the client."
Internal note: "List of the most important points to clarify before kickoff – please go through and check off everything."
Minimum effort: "1 hour"
Save.
The newly created work packages and the checklist can be rearranged in the component tree using drag & drop. In this example, the checklist "Internal alignment before kickoff" was moved to the top because it should be done first.
Sarah: “So, now we're going even deeper into the details. We've defined our epics and created the work packages – now it's about getting really specific with the tasks inside those packages. Let's start with 'Internal alignment before kickoff.' Tim, what do we need for that?”
Tim: “Well, before the meeting, we need to make sure all the relevant points for the kickoff are clarified internally. So we don’t forget anything, we should set up a checklist with the most important to-dos.”
Michael: “Exactly. Let me quickly show you how that works. For the checklist, we can create so-called to-dos. Those are meant for small, clear tasks you can just check off to make sure the prep goes smoothly.”
(Michael opens the “Internal alignment before kickoff” checklist in Leadtime and shows the input form for to-dos.)
Michael: “You see, we can just enter the tasks here as a list.”
(The team workshopped a series of to-dos for the checklist.)
To-dos for “Internal alignment before kickoff”:
Set Customer Success Manager: Figure out who's the main contact for the customer during onboarding. Add the name to the project.
Assign Implementation Specialist: Make sure there's a technical specialist planned for system setup and data migration. Check their availability for the next 4 weeks.
Let Training Lead know: Tell the training lead about the new project and sync on a rough timeline for trainings.
Make sure support is covered: Check if there are enough support resources for the go-live phase. Adjust holiday plans if needed.
Sort out access to customer docs: Make sure all the customer's relevant documents (data exports, list of requirements, existing process docs) are added to the project folder.
Roughly sketch onboarding timeline: Based on project start and desired go-live date, create an initial rough timeline.
(Michael is typing the points in.)
Sarah: "Perfect. We can just knock off the points little by little. So, what about the work packages themselves?"
Michael: "These are already set up. Let's take the 'Project Kickoff'. Every work package in Leadtime has a form that we can attach. I'll quickly explain why that's important."
(Michael opens the epic "Project Kickoff" and selects the work package "Conduct Kickoff Meeting".)
Michael: "In the description of the work package, you find the 'what' – so, what needs to be done. The 'Internal note', on the other hand, works as the instructions for the person working on it, so that's the 'how'. But: So the person can actually get the work package done, the requirements have to be clear. That's exactly what the form is for."
Sarah: "The thing is: Every time we do this kind of onboarding, the situation is always a bit different: The customer has different requirements, different amounts of data, different training needs. With the form questions, we can basically customize the work package for the exact situation."
Michael: "Exactly. And the questions for this first task package could help us talk about the right topics in the kickoff meeting. You work through the points in the meeting and enter the answers right into the form. And the answers also affect the other work packages."
Sarah: "Awesome. Let's collect the questions for the kickoff meeting."
(The team comes up with the questions together.)
Questions for the task package "Conduct kickoff meeting":
1. Who is the main contact person at the client?
Question type: Person (from client side)
Description: Name and role of the person at the client who acts as the main contact throughout onboarding.
Michael: "'Person' is a special question type. With it, you can pick someone directly from the client's team or enter manually. It's super handy because this person can then be listed as the contact in later tasks right away."
2. How many client employees will use the CRM?
Question type: Number
Description: Number of end users who will actively use the CRM after onboarding.
Tim: "That's important for planning training. If it's only 3 people, one session is enough. With 15, we need several dates."
3. Which data sources should be migrated?
Question type: Checkboxes (multiple choice)
Options:
Excel file with customer contacts
CSV export from existing CRM
Offer and invoice data from accounting software
Other (please describe in the comments field)
Description: Which systems or files should have data imported into the new CRM?
Lisa: “That immediately gives me an overview of which data sources I need to check. After that, I can better estimate how much effort the migration will take.”
4. Does the customer need individual quote templates?
Question type: Radio button (Yes/No)
Description: Should a completely custom offer template with its own logo, layout and text blocks be created?
Michael: "We can use this question later for a condition."
Daniel: "So what exactly is a condition?"
Michael: "Work packages can be shown or hidden based on certain answers. Let’s take the question 'Does the customer need custom offer templates?' as an example. If this is answered with 'Yes', we can use a condition to have the work package 'Create custom offer template' show up automatically. If 'No', it stays hidden."
Daniel: "Cool, so that means the structure of the project will adjust automatically depending on our answers?"
Michael: "Yeah baby, you got it. Let’s keep going."
5. What training formats does the customer want?
Question type: Checkboxes (Multiple choice)
Options:
Live on-site training
Online training via video conference
Recorded training videos
Written guide / manual
Description: How should the user training be carried out?
Daniel: “That helps me structure the training planning right away. Depending on what the customer chooses, I have to prepare different materials.”
6. When is the desired go-live date?
Question type: Date
Description: By when should the CRM system be live and used productively?
Sarah: "This is the most important question for the timeline. From this, we figure out how much time we have for all the other steps."
7. How many people will join the kickoff meeting?
Question type: multiplier
Description: Number of people joining the kickoff meeting. Duration per person: 2 hours.
Michael: "The multiplier is super helpful if the time needed for a task depends on the number of people. For example: The kickoff meeting takes 2 hours per person. So if we type 4 people into the form, Leadtime will automatically multiply 4 times 2 hours, which is 8 hours of effort. That's super helpful later for scheduling and budgeting."
8. Are there any special requirements or wishes from the customer?
Question type: Long text
Description: Special features, customizations or processes the customer needs.
Tim: "We can write down anything here that doesn’t fit into the standard questions – like a special interface to another software or custom invoice fields."
9. Has the customer already worked with CRM systems?
Question type: Radio button
Options:
Yes, is already using another CRM
No, first CRM system
Description: The customer's previous experience with CRM systems.
Daniel: "That changes the level of training. If the customer already knows another CRM, we can dive in quicker. If not, we have to cover more basics."
Sarah: "Perfect. This is exactly the structure we need so we collect all the important info at kickoff and don't forget anything."
Michael: "And don't forget: This form principle applies to all work packages. For each package, think about which questions need to be answered so nobody has any more follow-up questions at the end."
Sarah: "So, let's move on with the other packages then. Or do you guys need a little break?"
(The team nods, Sarah announces a 15-minute break.)
Now it's about supplementing the previously created work packages and checklists using forms. These forms help adapt the work packages flexibly to the specific project situation.
In our example project, the starting point changes from client to client – for example, the data sources, training needs, or required customizations change. The form questions help to tailor the work packages to the concrete, current situation.
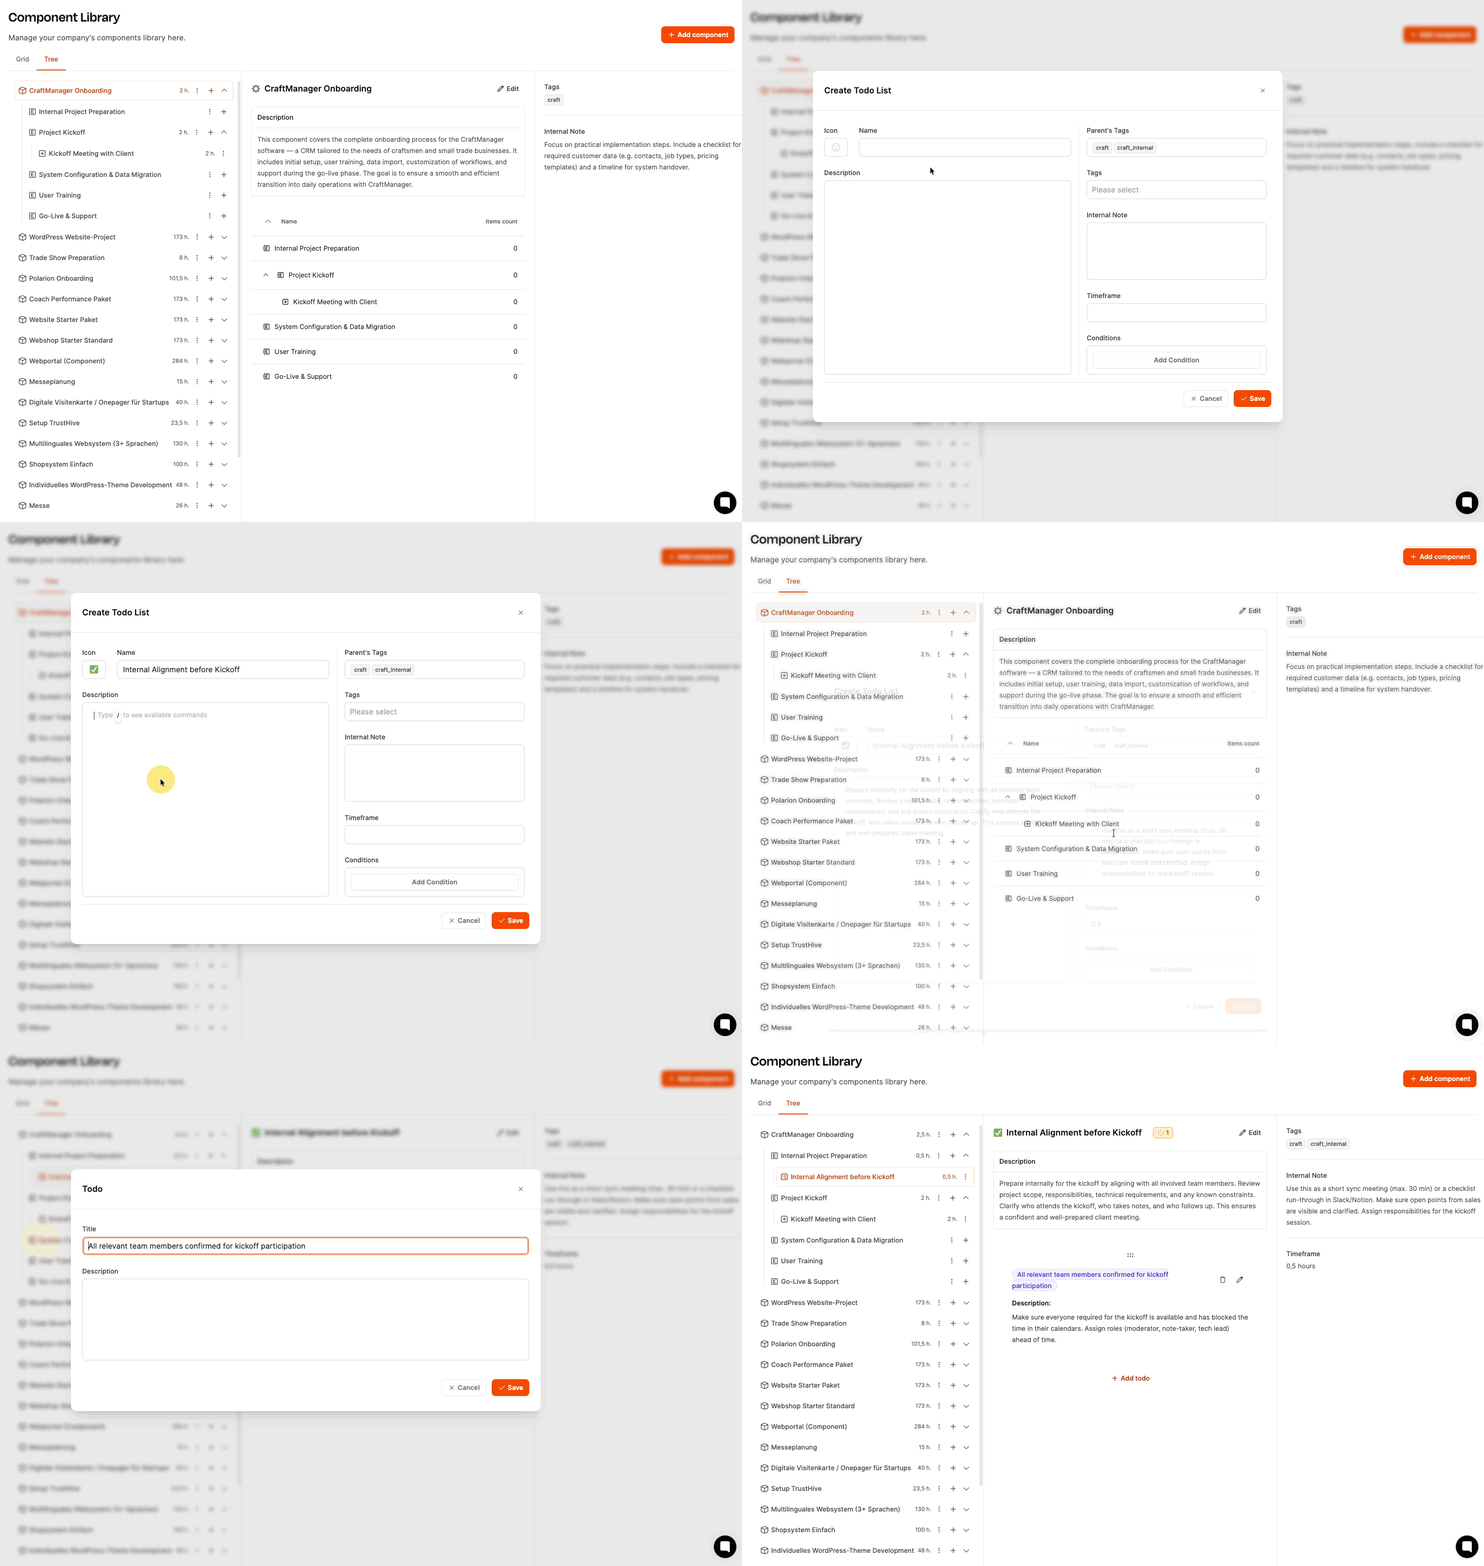
Checklists are made up of single tasks (to-dos) that have to be worked through one after the other.
Here's how:
Select the checklist (e.g. “Internal Alignment before Kickoff”) in the component tree.
Click the “Add To-Do” button in the middle.
A dialog will open:
Enter title for the to-do (e.g. “Set Customer Success Manager”).
Optional: Add description.
Save.
The to-do now appears in the checklist and you can check it off as you work through the project.
Repeat these steps for all to-dos in the checklist.
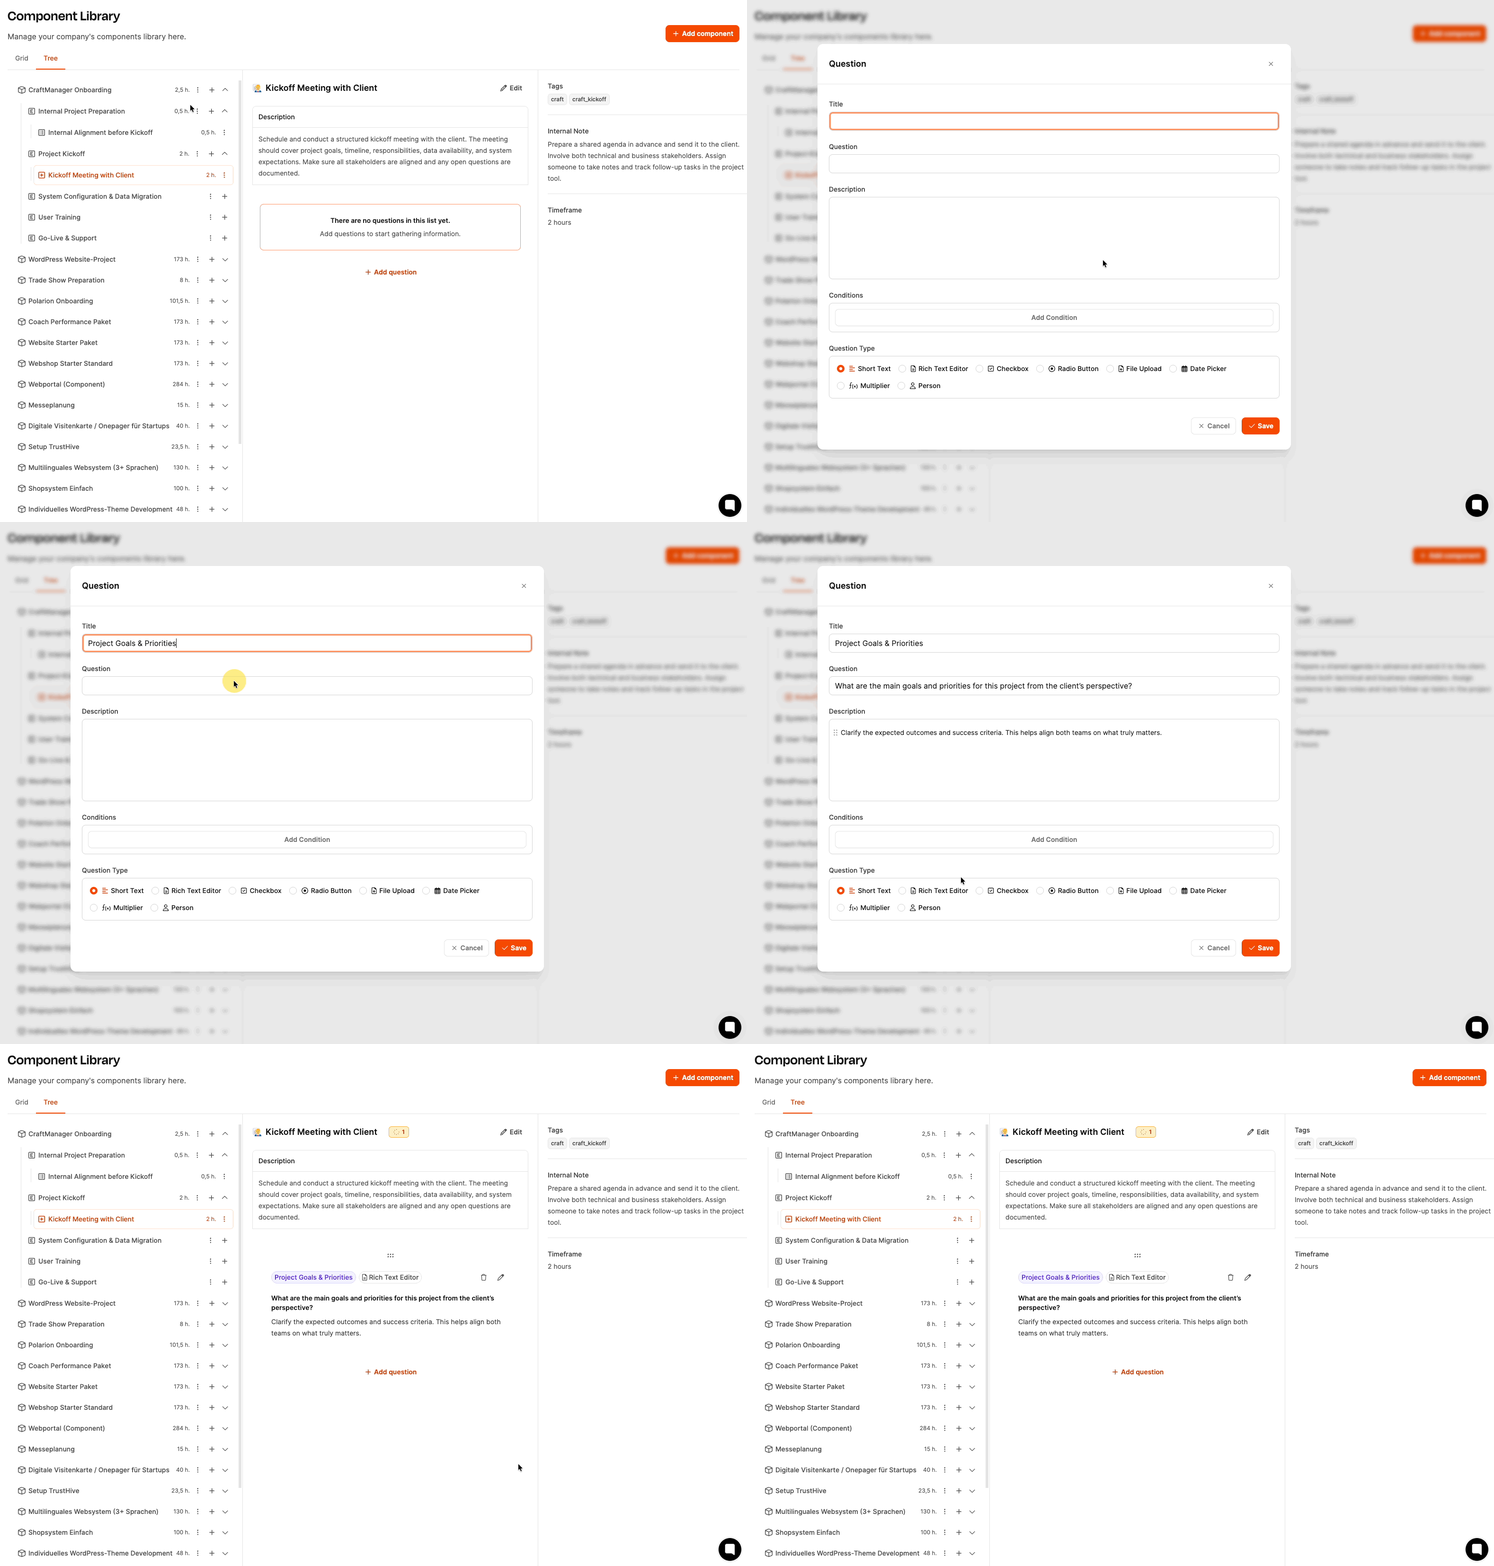
Questions make it possible to adjust a work package flexibly to the specific project situation.
Here's how it works:
In the component tree, select the work package (e.g. “Hold kickoff meeting”).
Click on “Add question”.
A dialog opens:
Title: Short name for the question (e.g. “Main customer contact”).
Question: Formulated question (e.g. “Who is the main contact at the customer?”).
Description: Explanation of the question (e.g. “Name and role of the person at the customer who is the main contact during onboarding.”).
Question type: Choose the right question type (e.g. “Person”, “Number”, “Radio button”, “Checkboxes”, “Date”, “Long text”).
For Checkboxes or Radio buttons: Define options (e.g. “On-site live training”, “Online training via video conference”).
Save.
The question is added to the work package and will be filled in later when the project starts.
Repeat this step for all questions in the work package.
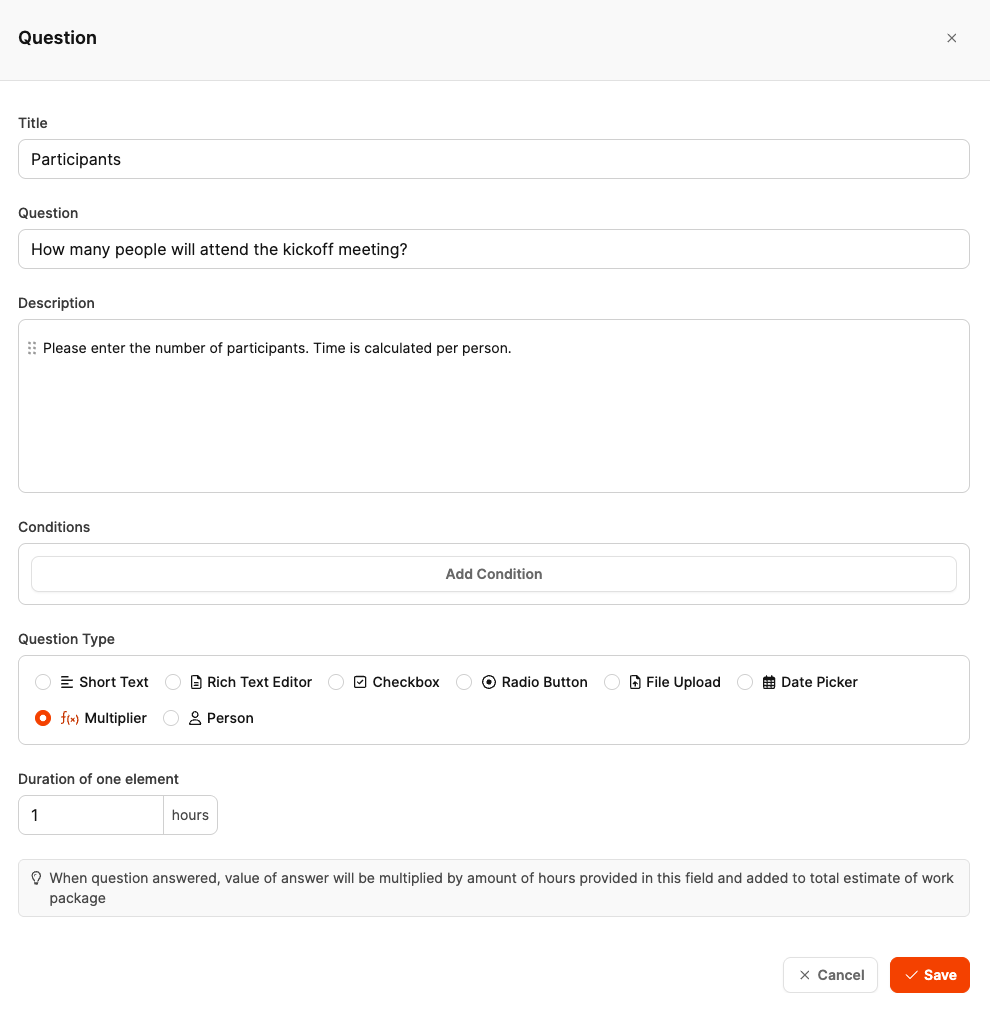
The question type Multiplier affects the effort estimation of the work package:
Example: Question “How many people are taking part in the kickoff meeting?”
The question notes that 2 hours per person are planned.
If the user puts in “4 people” later, the effort is automatically set to 8 hours.
This is how you set up a multiplier:
Add question (see step 2).
Select question type “Multiplier".
Enter the hours in the field “Duration per unit" (e.g. “2").
Save.
You can change the order of the questions by drag & drop. For example, it's often smart to put the question about the number of participants at the beginning.
After several intense hours, with breaks and lively discussions, the team has now set up the work packages for all the epics and added forms. While working on this, new ideas kept popping up, so Michael tweaked and expanded the component tree a few times. Extra epics and work packages were created or some existing ones were merged. Michael points out that you can move any element of the component tree using drag & drop. It's even possible to move a question from one work package to another.
Now, in the late afternoon, everyone is a bit tired but satisfied. It just feels good to have created a sustainable solution for a regularly recurring, time-consuming project.
Michael: "Ok, final sprint! Now that the structure is more or less set up, let's move on to the topic of conditions. I put this off all day because it's just better to do it once you can see the whole project in front of you."
Michael explains again what conditions are: "With conditions, we make sure certain questions or work packages only show up if a previous answer meets a certain condition. That way, the component stays clear and only ever shows the tasks that matter."
As a first practical example, the team opens the work package “Hold kickoff meeting”. There's the question:
"Does the customer need custom offer templates?"
Answer options: Yes / No
In the epic “System setup & data migration”, a work package "Create custom offer template" should only show up if this question was answered with "Yes".
Michael: "I'll show you how it's done. Let's go to the work package 'Create individual offer template' and add a condition there."
Steps:
In the epic "System setup & data migration" create a new work package: "Create individual offer template".
Add condition:
Component: CRM onboarding
Element: Hold kickoff meeting
Goal: Question "Does the customer need individual offer templates?"
Condition type: Answer is "Yes"
Save.
Michael: "Now, this work package is only visible in the project if 'Yes' was selected in the kickoff meeting. If 'No', it stays completely hidden."
Lisa: "That's awesome! This way, I only see the tasks that actually matter for each project."
Daniel: "I've got another condition in mind. If the client has more than 8 employees that need training, we'll need several training dates. Could we automate that too?"
Michael: "Of course! In the kickoff, we've got the question 'How many employees at the client will use the CRM?' – which is a 'number' type. Now we can set up a work package called 'Plan extra training dates' and set a condition: only visible if the number is more than 8."
Steps:
In the "User training" epic, create a new work package: "Plan additional training dates".
Add condition:
Component: CRM onboarding
Element: run kickoff meeting
Goal: Question "How many client employees will use the CRM?"
Condition type: Number greater than 8
Save.
Daniel: "Perfect! That way, I can skip unnecessary planning of extra sessions for smaller clients."
Lisa: “I’ve got an idea too. For the question ‘Which data sources should be migrated?’ the customer can pick several options – Excel, CSV, accounting software. Could we create a separate work package for each data source, so it only shows up if the matching option is selected?”
Michael: “Absolutely! That’s actually a really good idea, because every data source needs different prep.”
Steps:
In the epic "System setup & data migration" create three new work packages:
"Import Excel data"
"Migrate CSV export from CRM"
"Import accounting data"
For each work package, add a condition:
Component: CRM onboarding
Element: Run kickoff meeting
Goal: Question "Which data sources should be migrated?"
Condition type: Answer contains "Excel file with customer contacts" (or as appropriate for the other packages)
Save.
Lisa: “That's super handy! That way, I’ll only see exactly the migration packages that actually come up for each project.”
Julia: “I've got another idea. Every time we go live, there are always a few standard checks we should go through – for example, whether email integration works, if the invoice templates are set up right, if user permissions are set correctly. Couldn’t we standardize all that too?”
Michael: "Good idea! Even better: instead, we could create an acceptance test. It's more precise than a simple checklist. Acceptance tests actually come from software development. They’re a bit more flexible."
Michael explains:
Acceptance tests consist of:
Title
Description
Steps
Expected result
During approval, the reviewer can specify: “OK” or “Not OK” and in the second case, leave a comment. If “Not OK” is picked, a ticket to fix the problem can be created right away.
Lisa: “Cool, we can totally use this for our own software tests too!”
The team creates the first test cases for go-live together. Michael shows an example test case “Email Integration”:
Title: Test the email integration
Description: “Please check if the email integration works properly with the CRM.”
Steps:
Save customer's email account in CRM
Send test email to customer
Check if the email shows up in the CRM outbox
Check if the customer's reply shows up in the CRM inbox
Expected result: "Emails show up correctly in both outbox and inbox. No error messages."
The team creates more acceptance tests:
"Check invoice templates"
"Test access rights"
"Check mobile app functionality"
"Verify customer data import"
Sarah: "Let's create one last work package 'Lessons Learned Meeting'. After go-live, we'll take some time together to write down what went well and what didn't. Then we'll revise the project component—both the effort estimates and the content if needed."
Everyone agrees and really likes the idea.
Sarah ends the meeting: "When the project actually starts, please add more info to the work packages in the component library as needed, if that makes things easier to do. Thanks to everyone—this was a really productive day!"
In the final phase of component creation, it's all about refining the project structure even more. This fine-tuning is done using conditions, which only make certain work packages, questions, or acceptance tests visible if a previously set condition is met.
The aim of this phase is to make things less complicated when filling out the project later. Work packages and questions you don't need will be hidden dynamically, so only the elements relevant to the specific project show up.
You should do this fine-tuning when the basic structure of the component is set and most epics and work packages are already in place. Adding conditions lets you turn individual branches in the component tree on or off as needed.
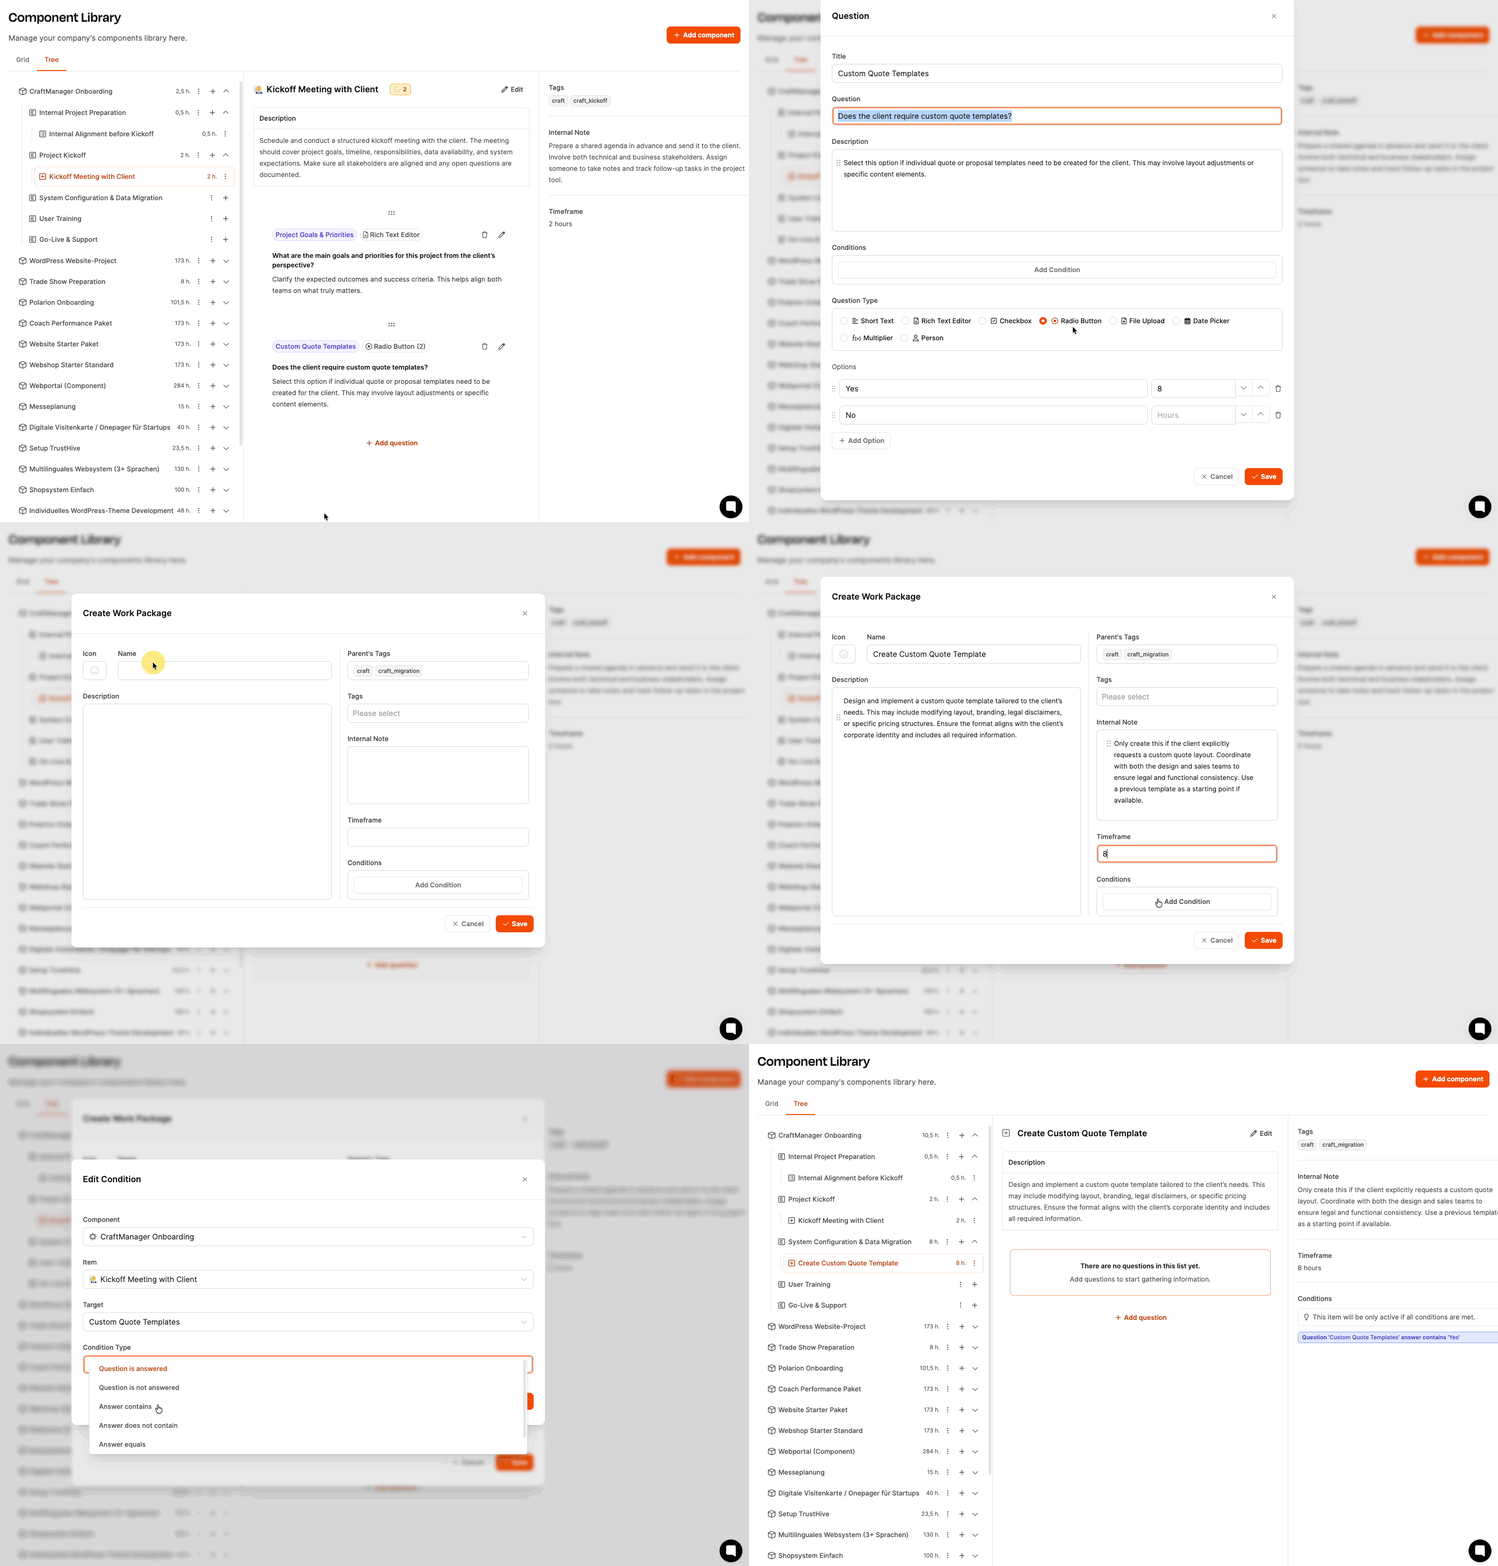
Example: The work package "Create custom offer template" should only be visible if the question "Does the customer need custom offer templates?" was answered with "Yes" in the kickoff meeting.
Here's how:
In the epic “System setup & data migration” create a new work package: “Create custom quote template”.
Add condition:
Click on “Add condition”.
Component: CRM onboarding
Element: Run kickoff meeting
Goal: Question “Does the customer need custom quote templates?”
Condition type: Answer is “Yes”
Save.
The work package will now only show up in the project if the condition is met.
Example: The work package “Plan extra training sessions” should only be visible if more than 8 team members need to be trained.
Here's how:
In the epic “User Trainings”, create a new work package: “Plan additional training dates”.
Add condition:
Component: CRM onboarding
Element: Hold kickoff meeting
Goal: Question “How many employees at the customer will use the CRM?”
Condition type: Number greater than 8
Save.
Example: The work package “Import Excel data” should only be visible when, for the question “Which data sources should be migrated?” the option “Excel file with customer contacts” was selected.
Here's how:
In the epic "System setup & data migration", create a new work package: "Import Excel data".
Add condition:
Component: CRM onboarding
Element: Do kickoff meeting
Goal: Question "Which data sources need to be migrated?"
Condition type: Answer contains "Excel file with customer contacts"
Save.
Repeat this process for all other data sources (CSV, accounting software).
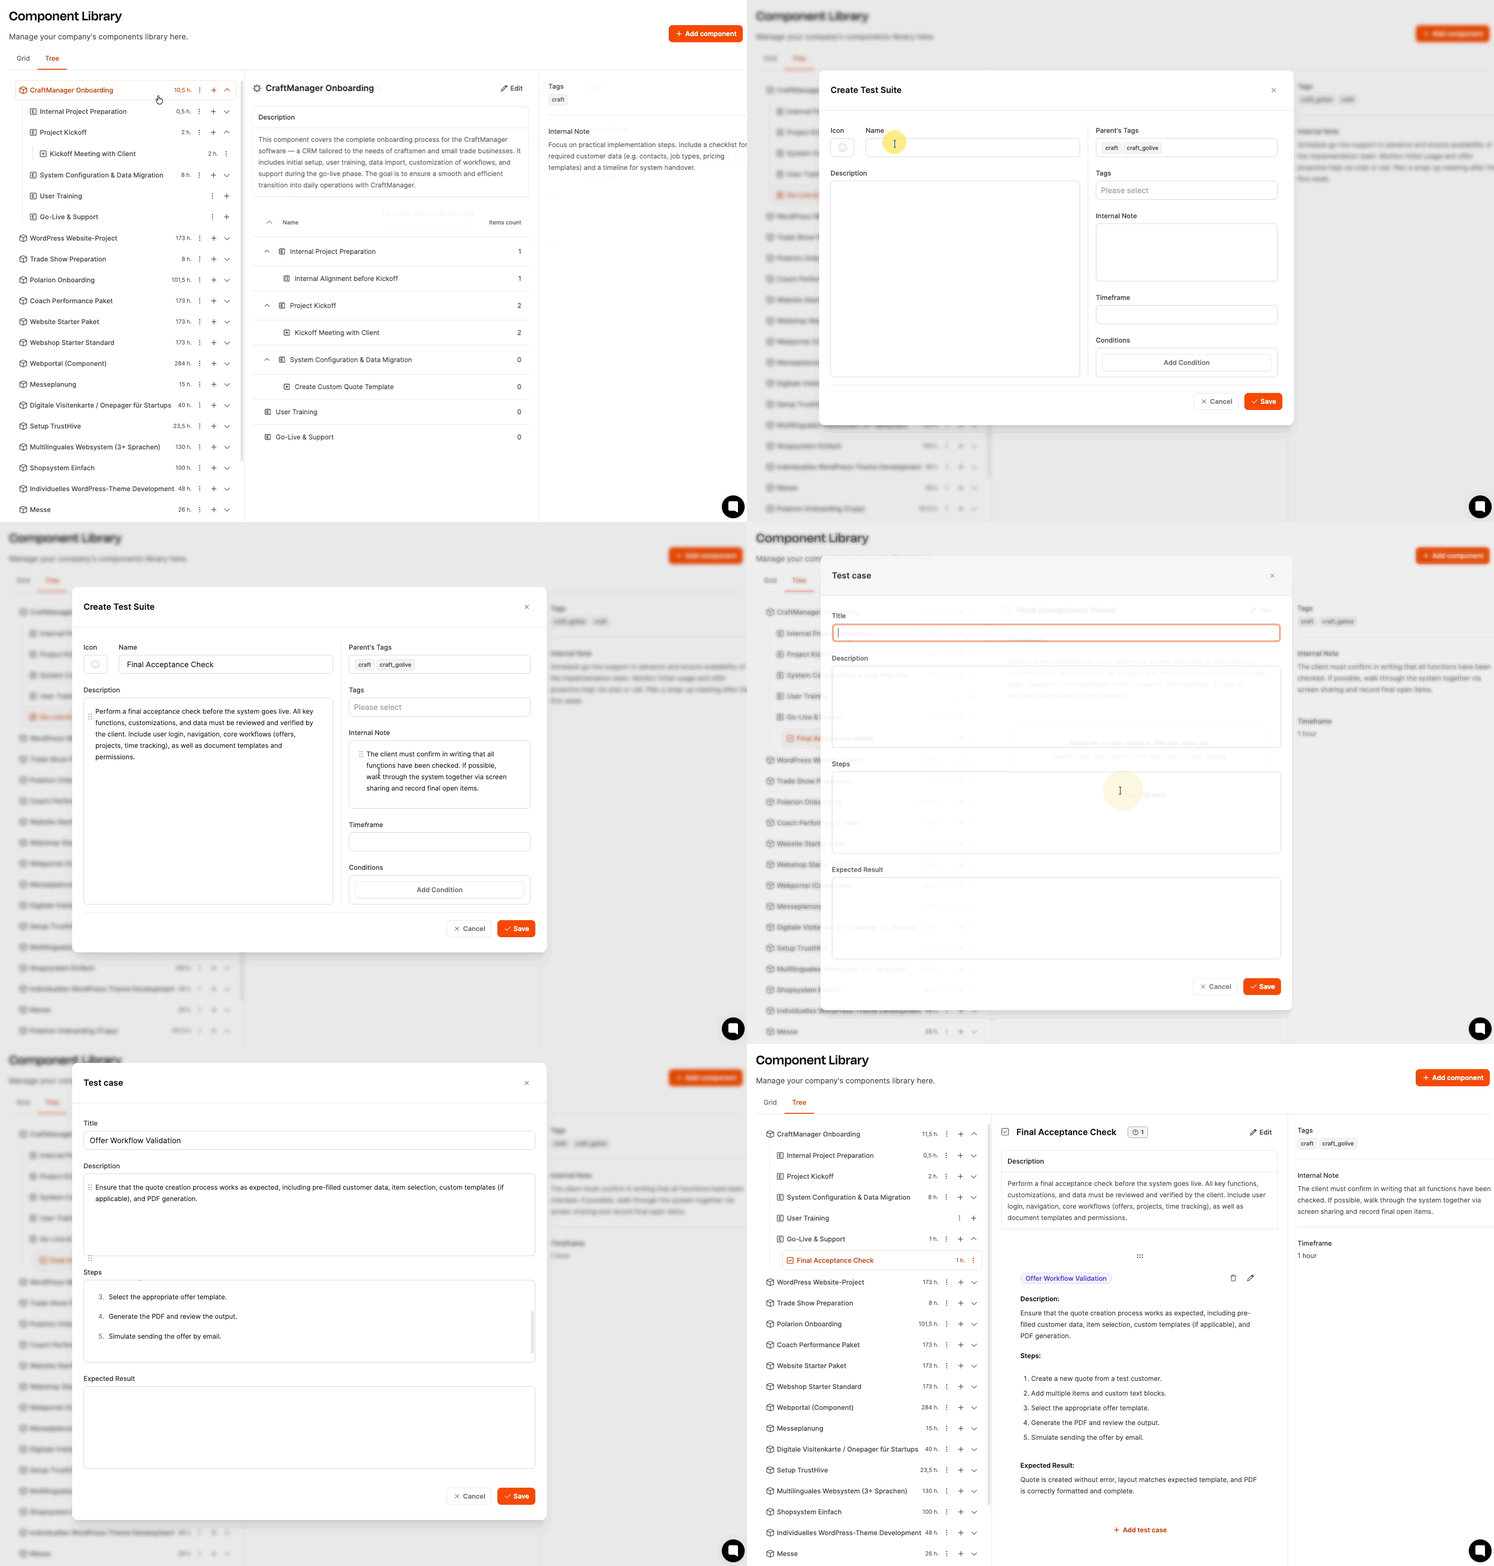
Acceptance tests are a special type of work package. They work kind of like checklists, but with detailed test steps and expected results.
An acceptance test defines:
Test title
Description of the test scope
Concrete steps to carry it out
Expected result
Here's how:
In the epic "Go-Live & Support" click the plus sign.
Select "Create acceptance test".
Fill out the fields:
Title: e.g. "Test email integration"
Description: e.g. "Please check if the email integration works correctly with the CRM."
Steps:
Add the customer's email account to the CRM
Send a test email to the customer
Check if the email shows up in the CRM outbox
Check the customer's reply to see if it appears in the CRM inbox
Expected result: "Emails are shown correctly in both the outbox and inbox. No error messages."
Save.
A tester checks the requirements and documents the result. If a test fails, a new ticket for bug fixing can be created right away.
In this workshop, the HandwerkerPro team created a comprehensive, flexible, and smart project component for CRM onboarding. The component:
Clearly structures the whole onboarding process into epics and work packages
Uses forms to flexibly respond to different customer situations
Uses conditions to display only relevant tasks
Enables realistic budgeting by setting minimum efforts
Integrates acceptance tests for a quality-assured go-live phase
Plans lessons learned to enable continuous improvement
Now this component serves as a reusable template for all the onboarding projects to come, making sure every new customer gets introduced to the CRM system in a professional, structured, and efficient way.