You’ll find this area under Billing → Invoice Review. Here, completed tickets are collected, checked, and turned into invoices for the customer. You can adjust time entries, fix titles, and decide whether certain tasks should be billed. Once you approve it, the invoice gets moved to the receivables section.
To the ticket system: Projects – Tasks tab (Ticket System)
In Leadtime, you can bill for different products and services. The most common way to do this in services is to invoice for working hours. In Leadtime, this is all based on tickets.
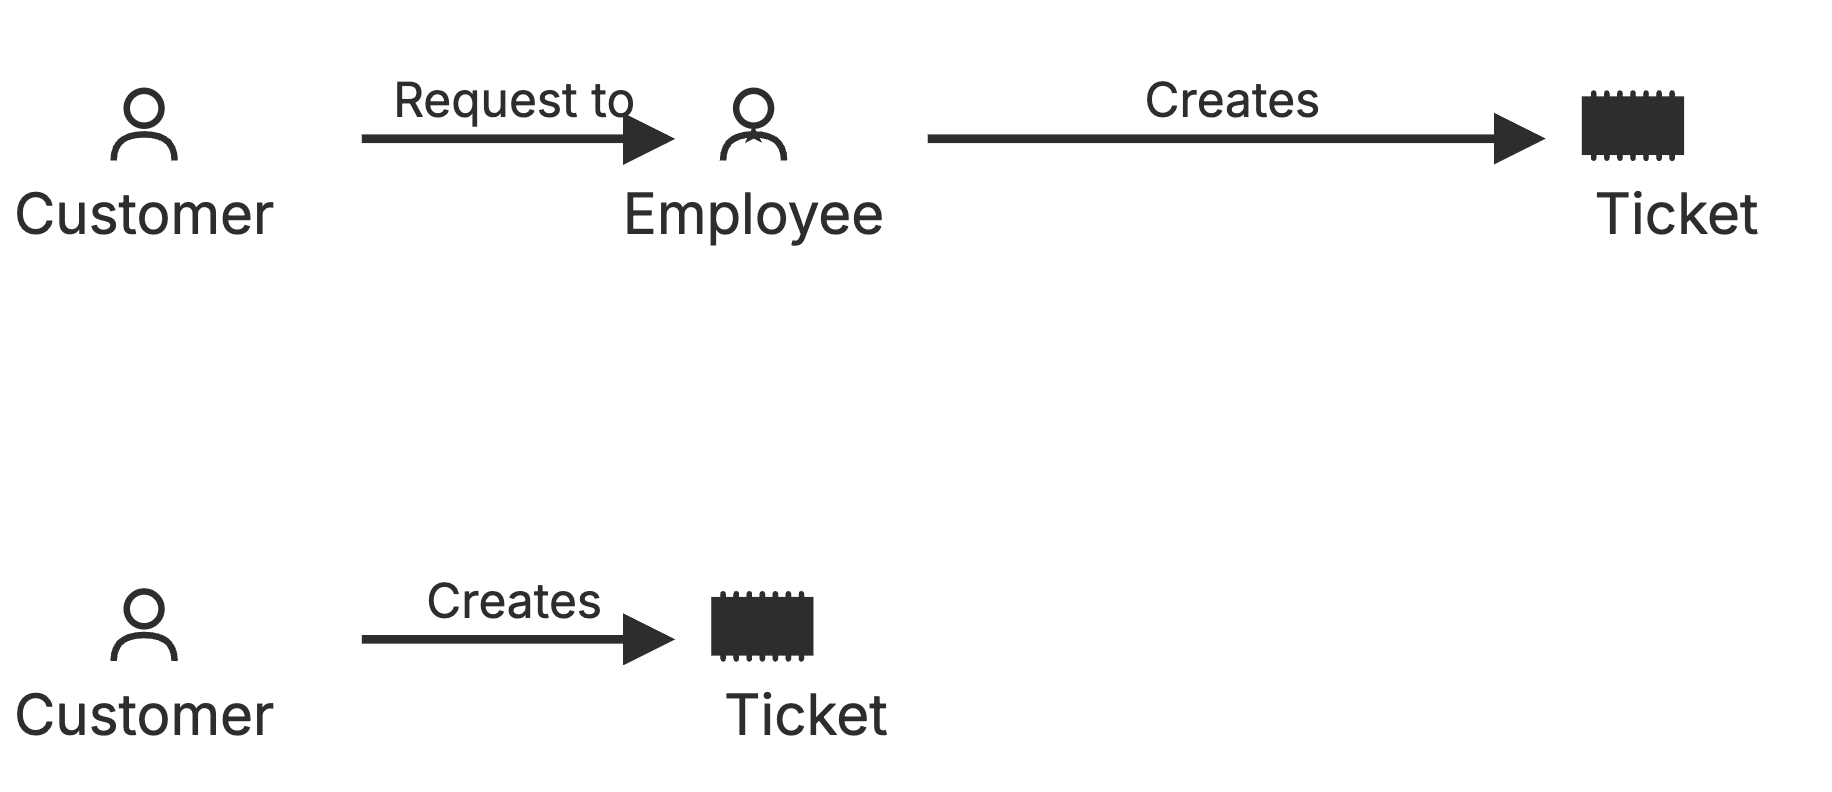
This is how it basically works: A company has customers, and for these customers, it handles projects. Each project is made up of lots of smaller tasks or issues that the company solves for each customer. For every task, a ticket is created; team members complete the work and log their hours on the ticket. The total working hours on the ticket are then multiplied by an hourly rate and invoiced to the customer.
This text walks you through one concrete example, describing the full process in detail – from working on and closing a ticket, all the way to the final invoice.
To the ticket system: Projects – Tasks tab (Ticket System)
Leadtime organizes projects and tasks in a clearly defined data structure. The billing system uses this structure to bill services automatically and accurately.
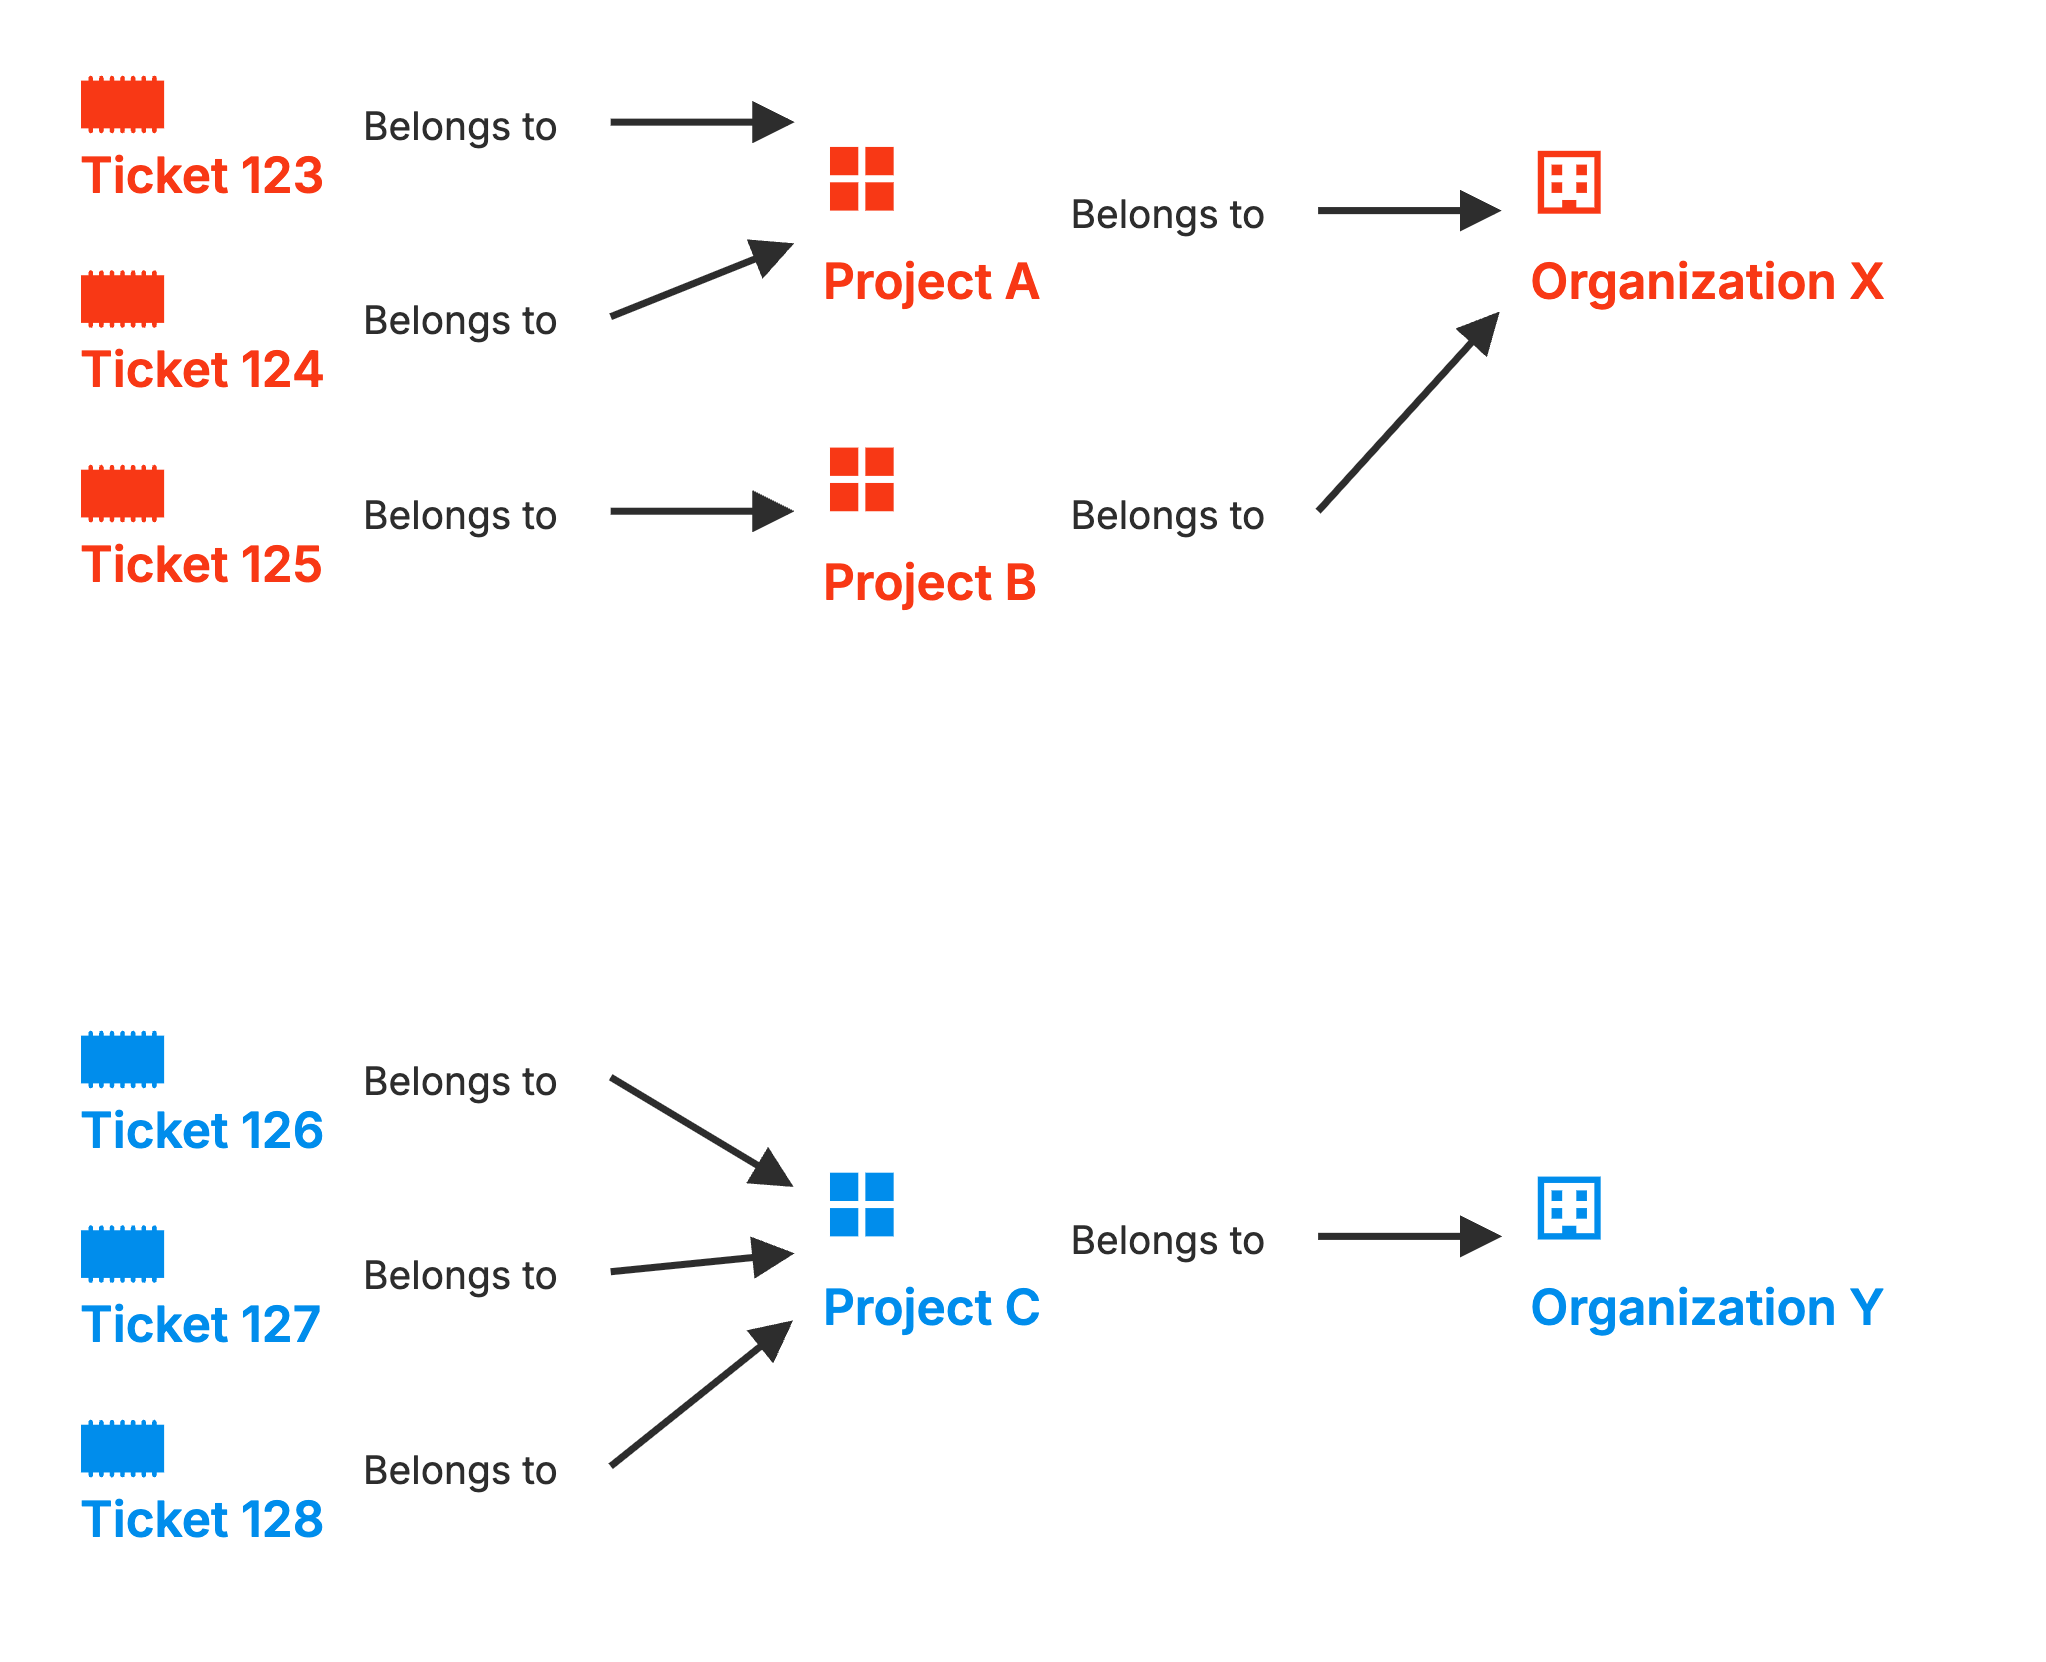
Every organization in Leadtime can include several projects. These are either:
Ongoing – For regular customer requests like support or maintenance.
One-time – For large projects that need to be specified in detail, planned, and quoted.
In this text, we're looking at ongoing projects, so projects where the customer keeps sending requests that we solve and eventually bill.
Projects contain tickets. For every customer request, a ticket is created. The customer can do this themselves if they have access to the Leadtime platform; otherwise, a team member can do it – for example, if the customer contacts you by phone or email.
In the customer project, the “Tasks” tab shows all tickets that are currently being worked on. However, these only become billable once they reach the “Closed” status.
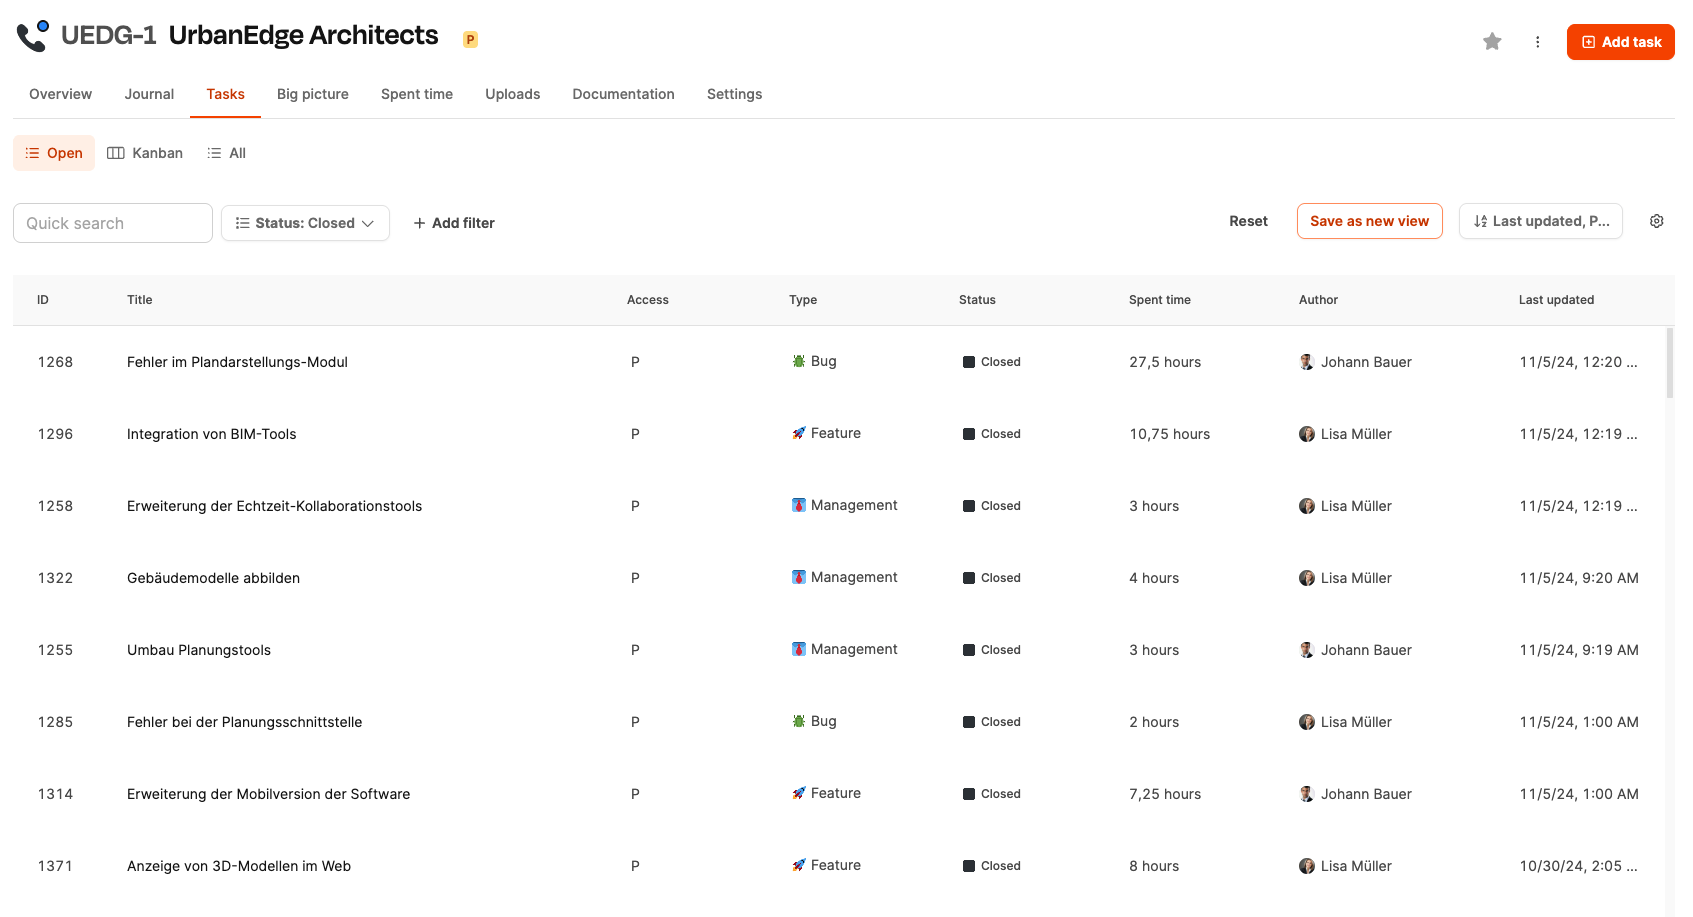
Status: Tickets go through different statuses like New, In progress, Done and Closed.
Time tracking: Employees log their working hours directly to the tickets.
Collaboration: Multiple employees can work on a ticket together and log their work hours on it. All hours worked by everyone involved are added up.

Task statuses are managed here: Custom task statuses
In this example, the ticket with ID 1296 was finally closed after a lot of work. As soon as the status of the ticket is changed to Closed, it becomes relevant for billing.
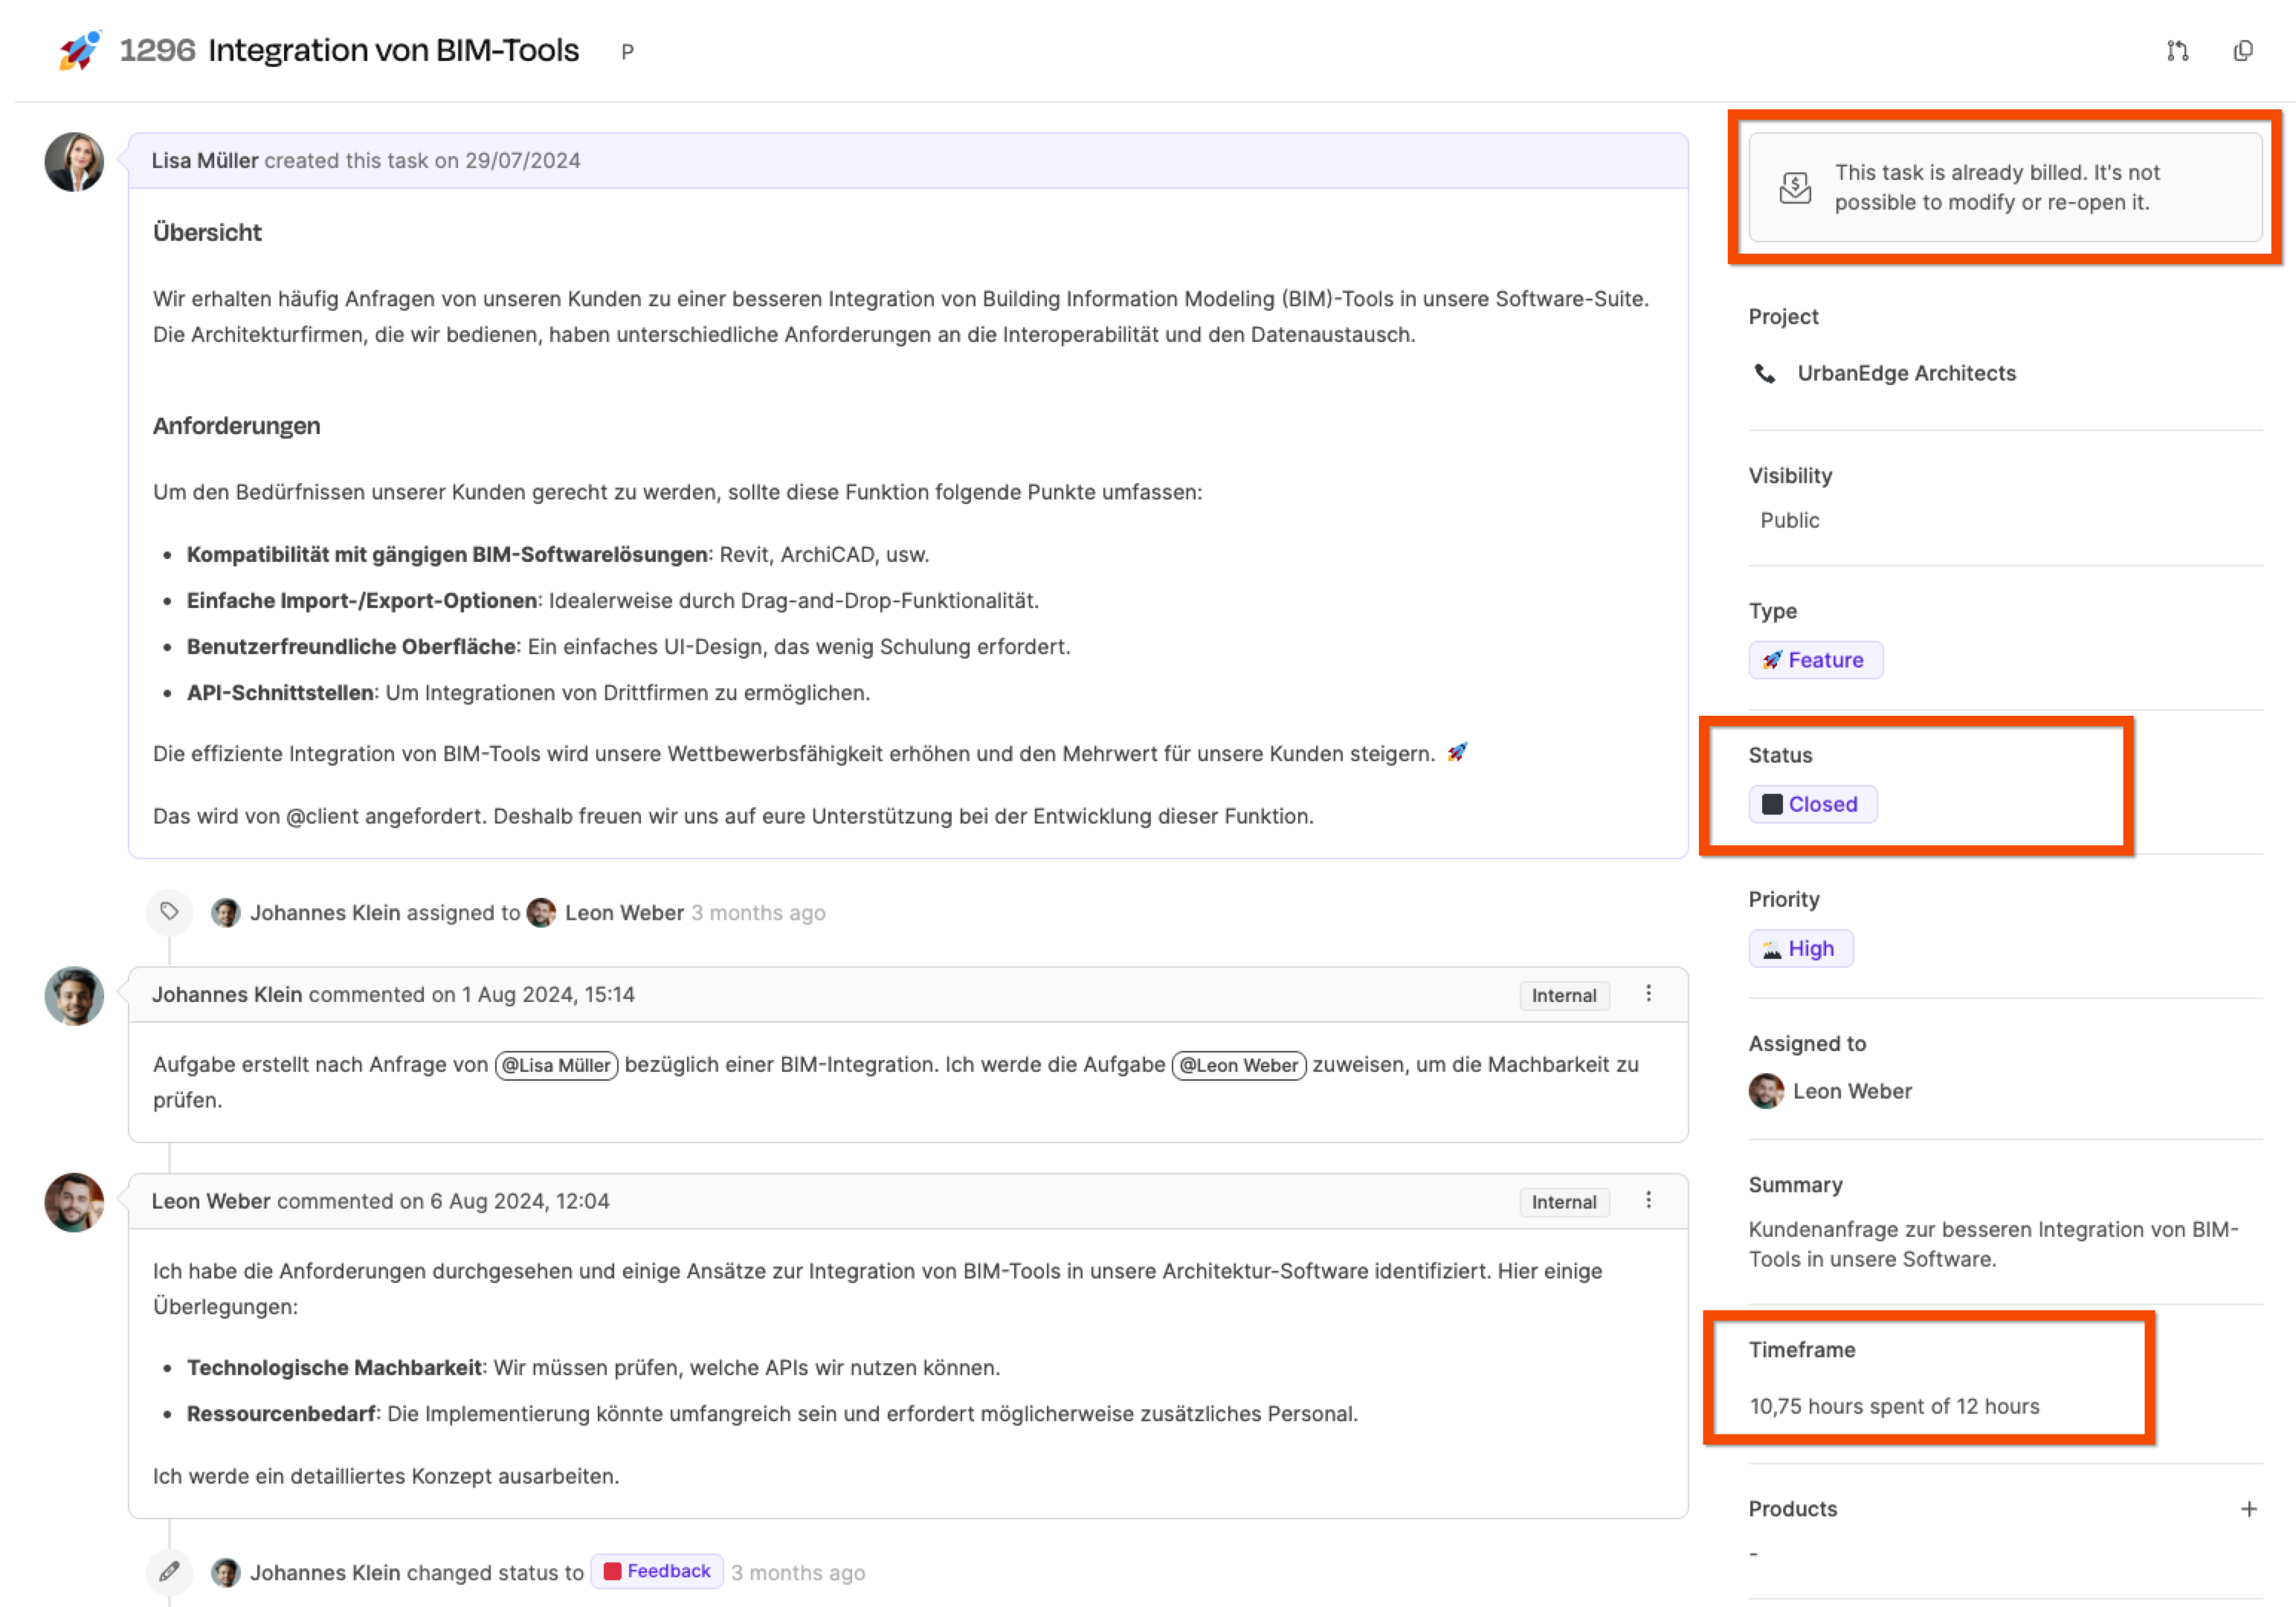
In the right column under “Time frame”, you can see the time spent working on the ticket. Here, we see that 10.75 hours were booked for this ticket even though the initial estimate was 12 hours.
Check a ticket's time tracking

To get more details about the ticket, we open the detailed view by clicking the line with the time estimate and booked time.
If you click on the time frame, the Time Tracking Statistics will open and break down all the time bookings in detail:
Date: Each entry is listed by day.
Employee: The people involved and their activities.
Activity: Clearly defined tasks like management, testing, or development.
Let's see how the total of 10.75 hours breaks down. Different employees logged time on the following activities:
Management: 1.75 hours
Testing: 4.15 hours
Development: 4.45 hours
The ticket with its 10.75 hours is ready for invoicing.
Go to Invoicing → Invoice review.
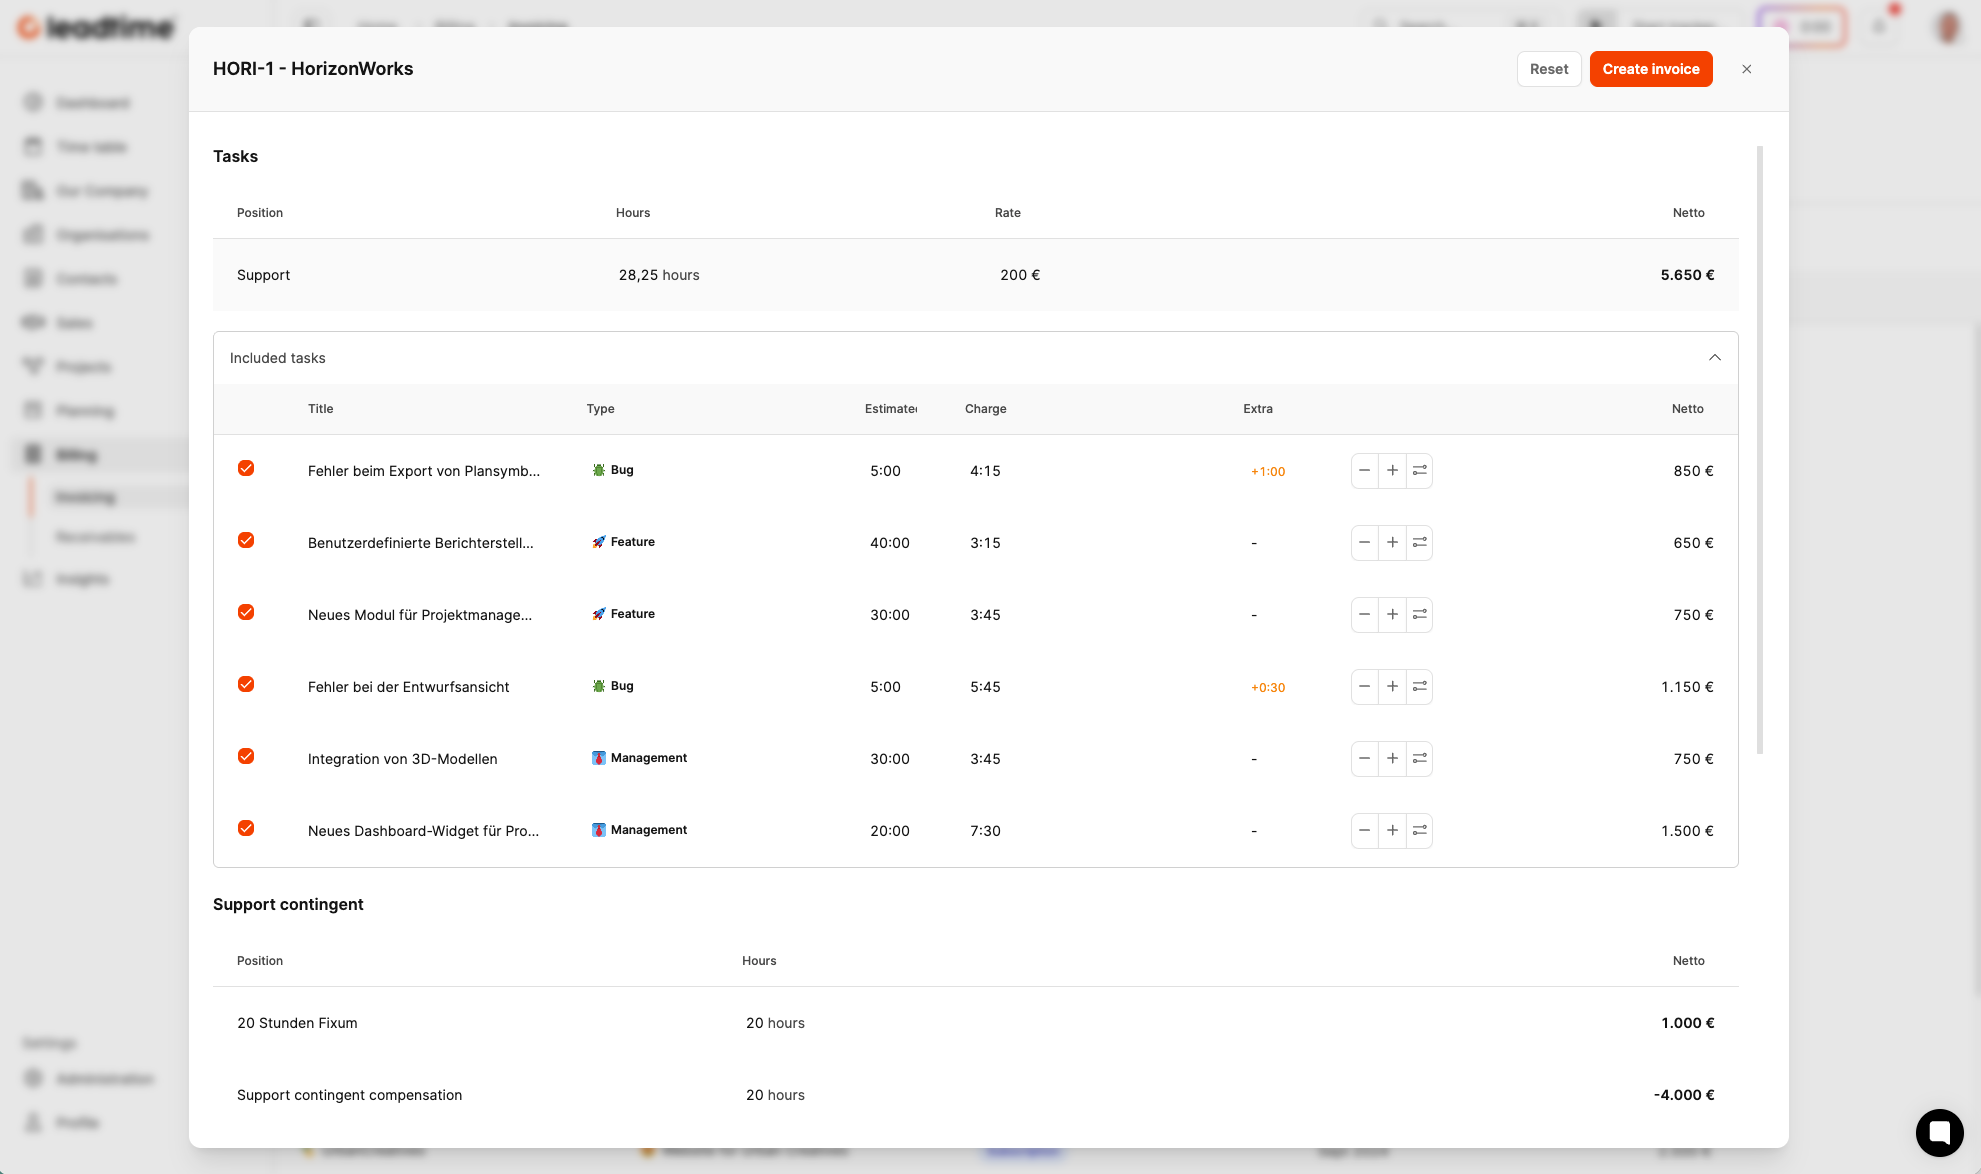
After closing the ticket, a new draft invoice automatically shows up in the Billing check section. As long as this draft invoice isn't billed, any additional tickets you close in this project will also be added to this pending draft invoice. In this example, all included tasks add up to a total of 80 hours.
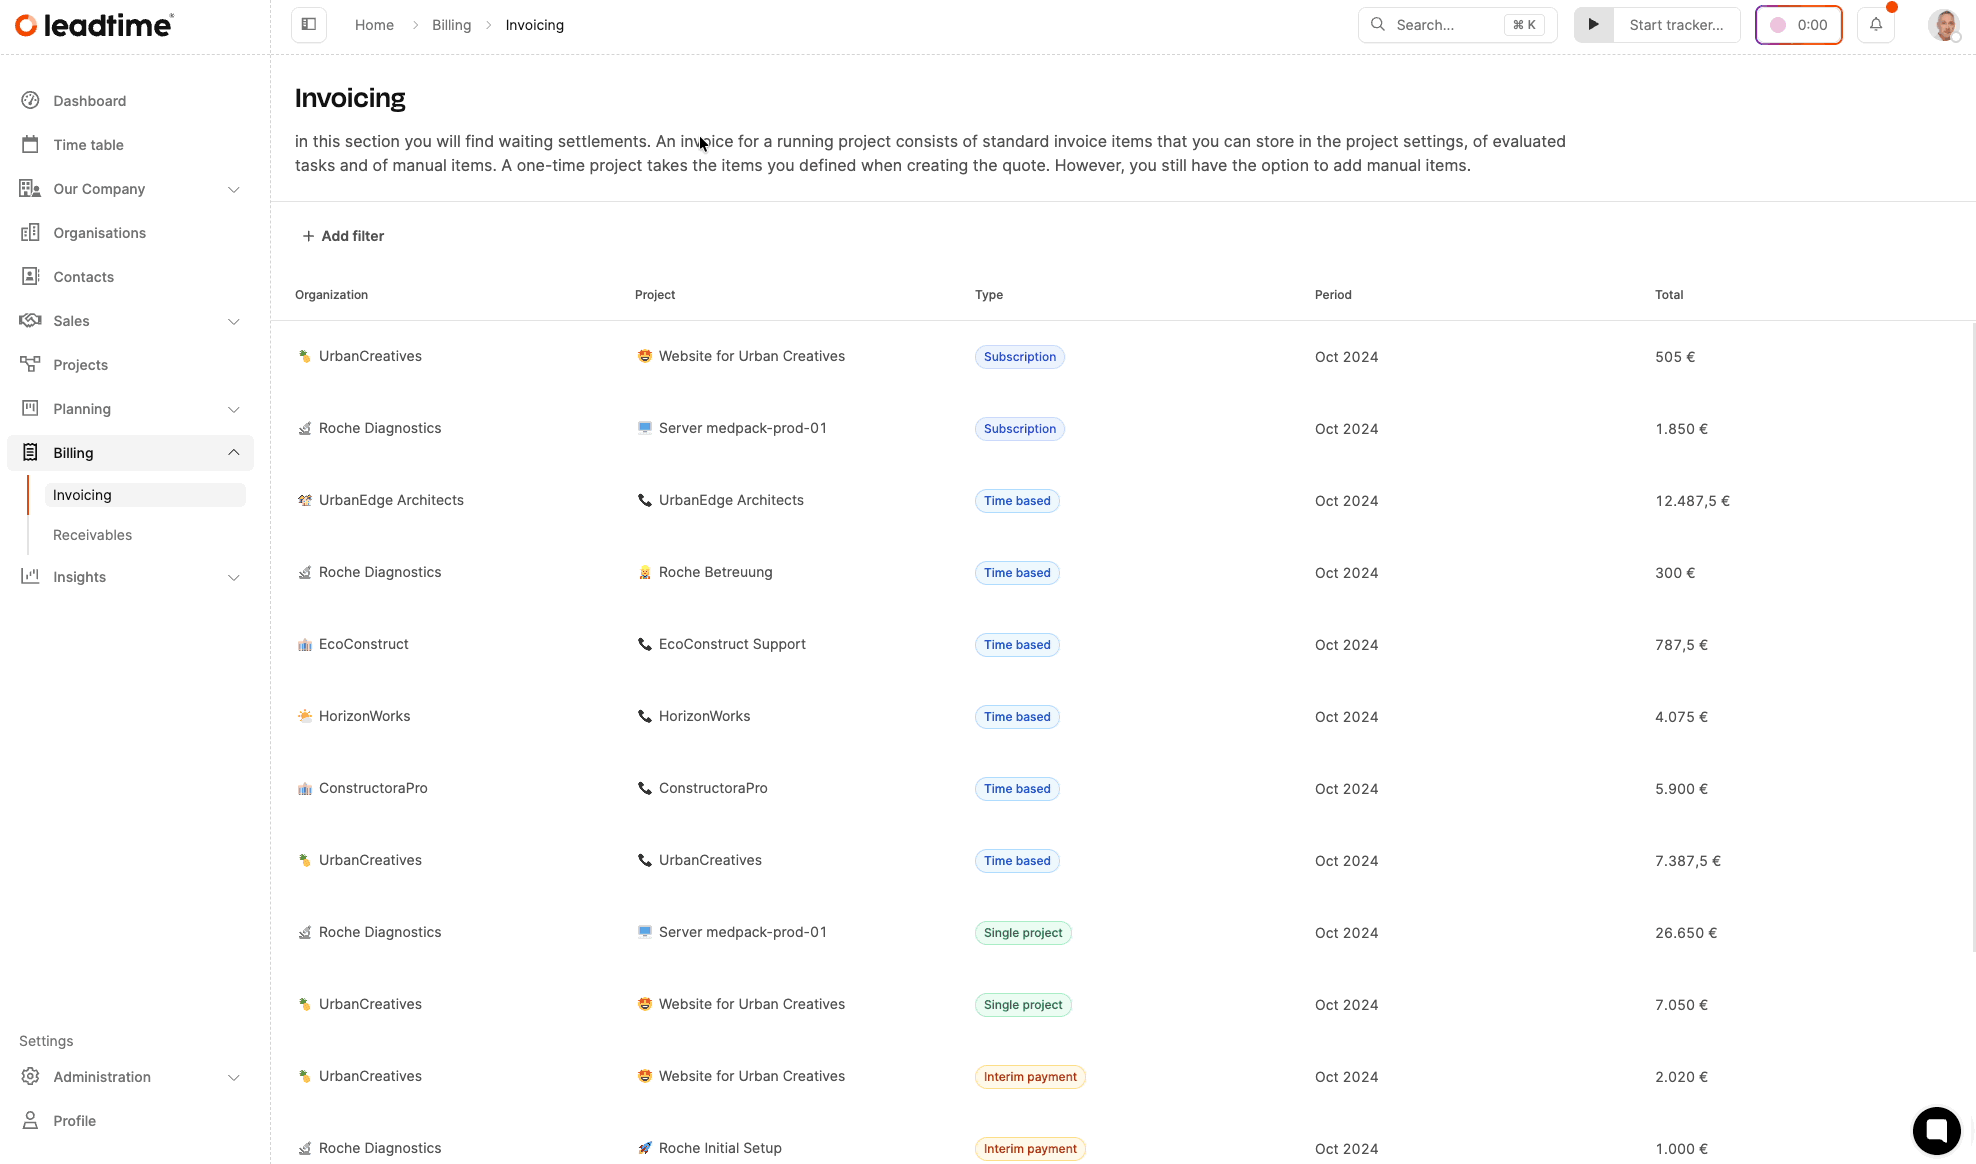
By clicking on “Included tasks” you can view the list of all tickets included in this draft.

Before you approve the invoice, you can review and adjust each ticket individually. Just click the right button in the small button bar next to the task.

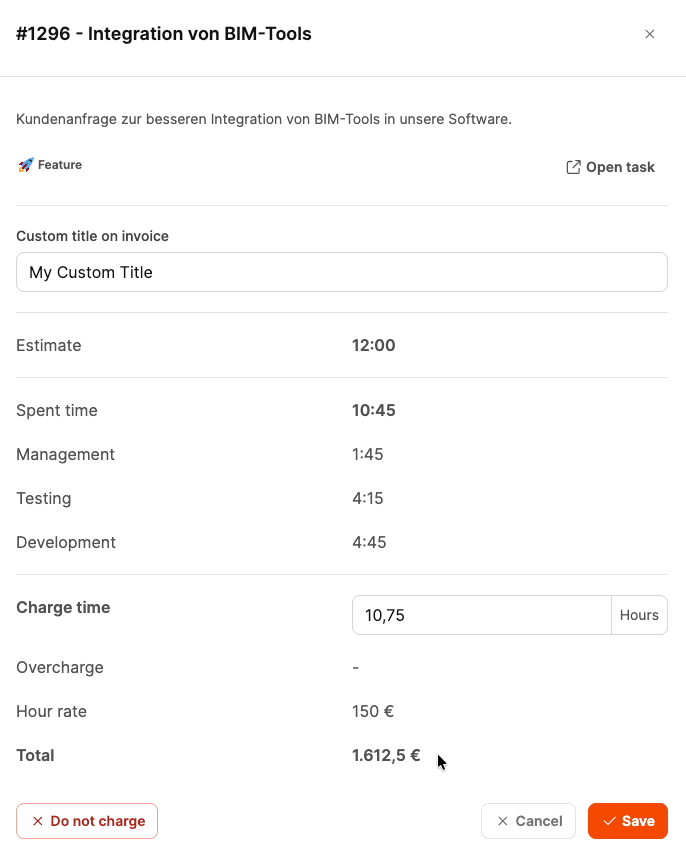
In the detail view, you can change the title of a ticket to make it easier for the customer to understand. For example, the title Integration of BIM tools can be expanded with extra details that help the customer clearly identify the task.
The user who releases the invoice can adjust the time booked on the tickets up or down. This increases or decreases the revenue generated by the respective ticket.

There are several scenarios that justify adjusting the billed time:
Increase to the estimated time: For example, in this case, it might make sense to bill the originally planned 12 hours instead of the actually worked 10.75 hours, if that's what was agreed with the customer.
Reduction of hours: If, for example, fewer hours should be billed as a gesture of goodwill, the hours can also be reduced.
All changes to ticket times are shown in the Additional column. In the screenshot, for example, 1h 15 minutes are billed additionally on top of the booked 10h 45 minutes for the ticket — so a total of 12 hours are billed.
The adjustment can either be made directly in the dialog or faster using the plus and minus buttons in the task list.
Example:
Time spent: 10.75 hours
Actually billed: 12 hours
Hourly rate: 100 EUR
Total cost: 1,200 EUR (with a deviation of +1:15 hours).
If you don't want to bill a ticket for any reason, you can exclude it by using the “Do not bill” option.
After you've made all adjustments, you can release the invoice draft. This is done with the “Bill” button at the top right of the page. This removes the invoice draft from the list and the invoice will show up in the “Claims” section.
Once the release is final, the ticket is considered billed and can't be changed anymore.
