You can find it under Your Company → Employees and then after choosing an employee in the list on the right side in the tab → Basics.
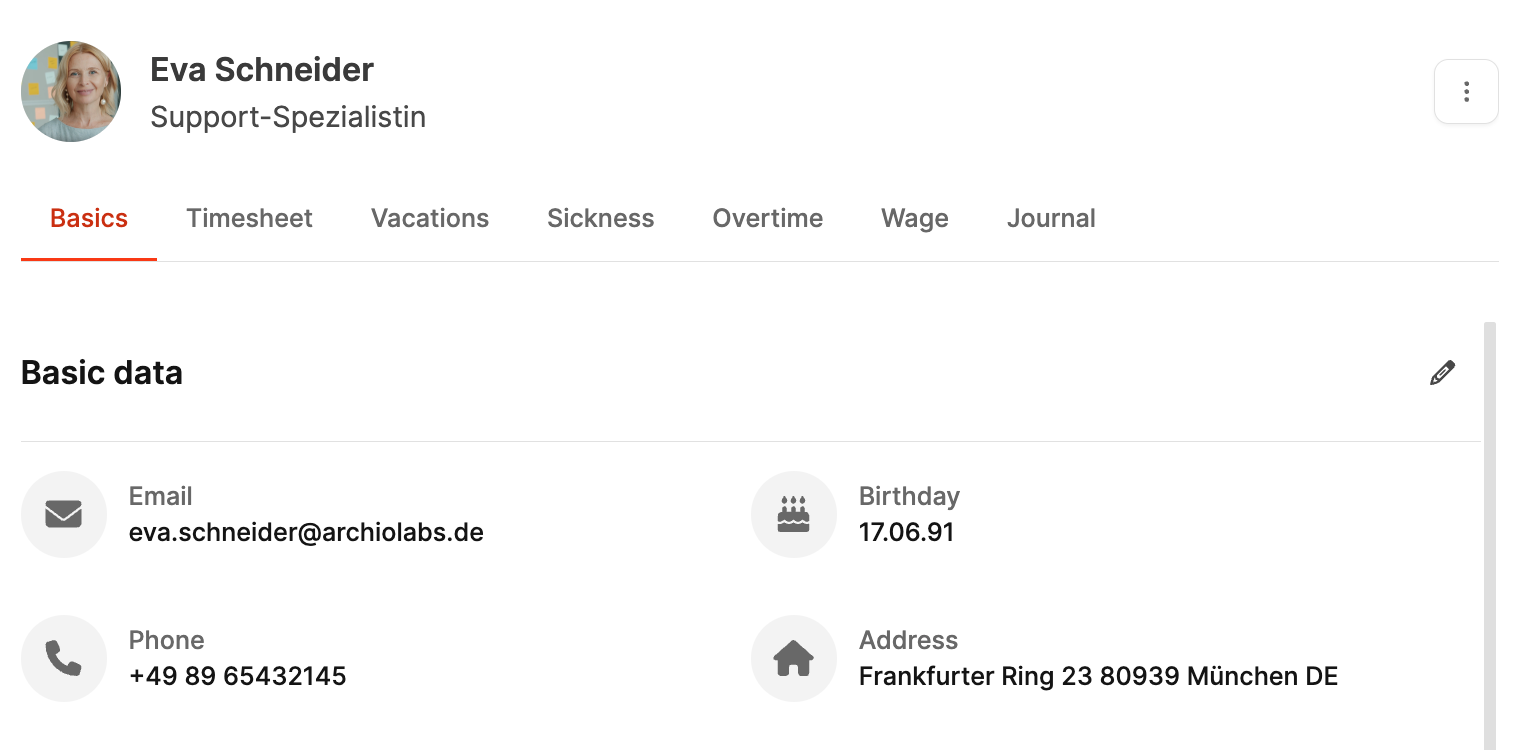
The tab Basics in the Employees section in Leadtime is there to manage all the essential master data and work-related info about an employee. Here you can enter and update personal details, Leadtime login info, working hours, salary and insurance data. This area forms the foundation for efficient staff management and gives you an overview of all the important info about your employee.
The Basics tab is split into several sections so you can enter and manage employee data in a clear way.
You can enlarge the profile picture with one click.

To delete an employee, click on the button with the three dots on the right. We recommend just deactivating employees who've left
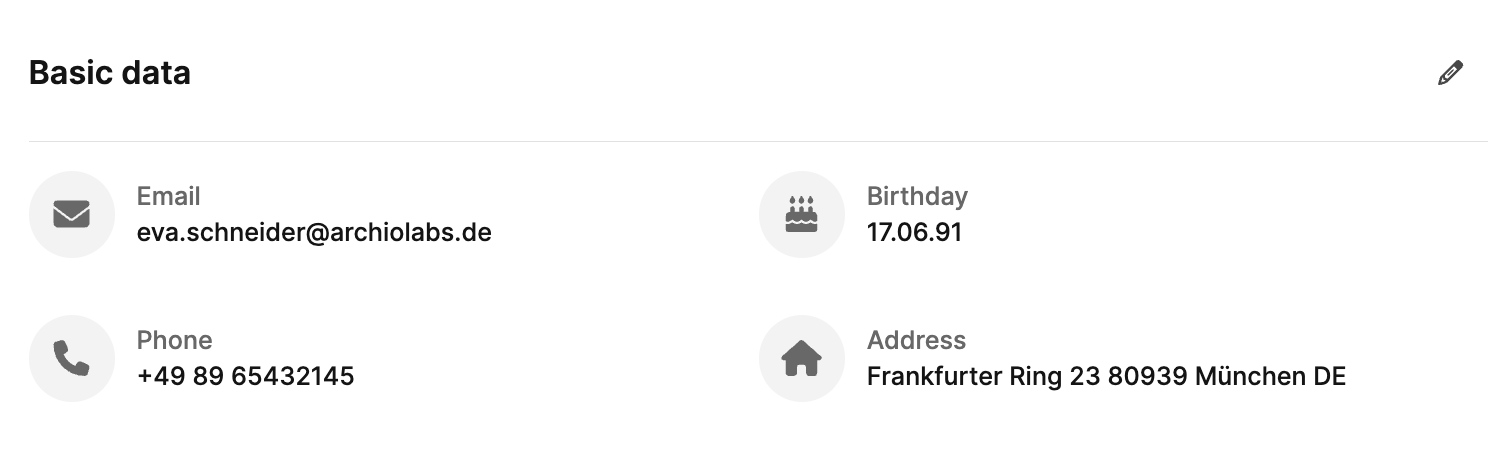
The dialog Master Data is used to record and manage all personal and contact information of an employee. This data forms the basis of employee management in Leadtime and makes sure that all relevant information is central, up to date, and easy to access.
You can open the edit dialog via the pencil icon at the top right in the Basic data section.
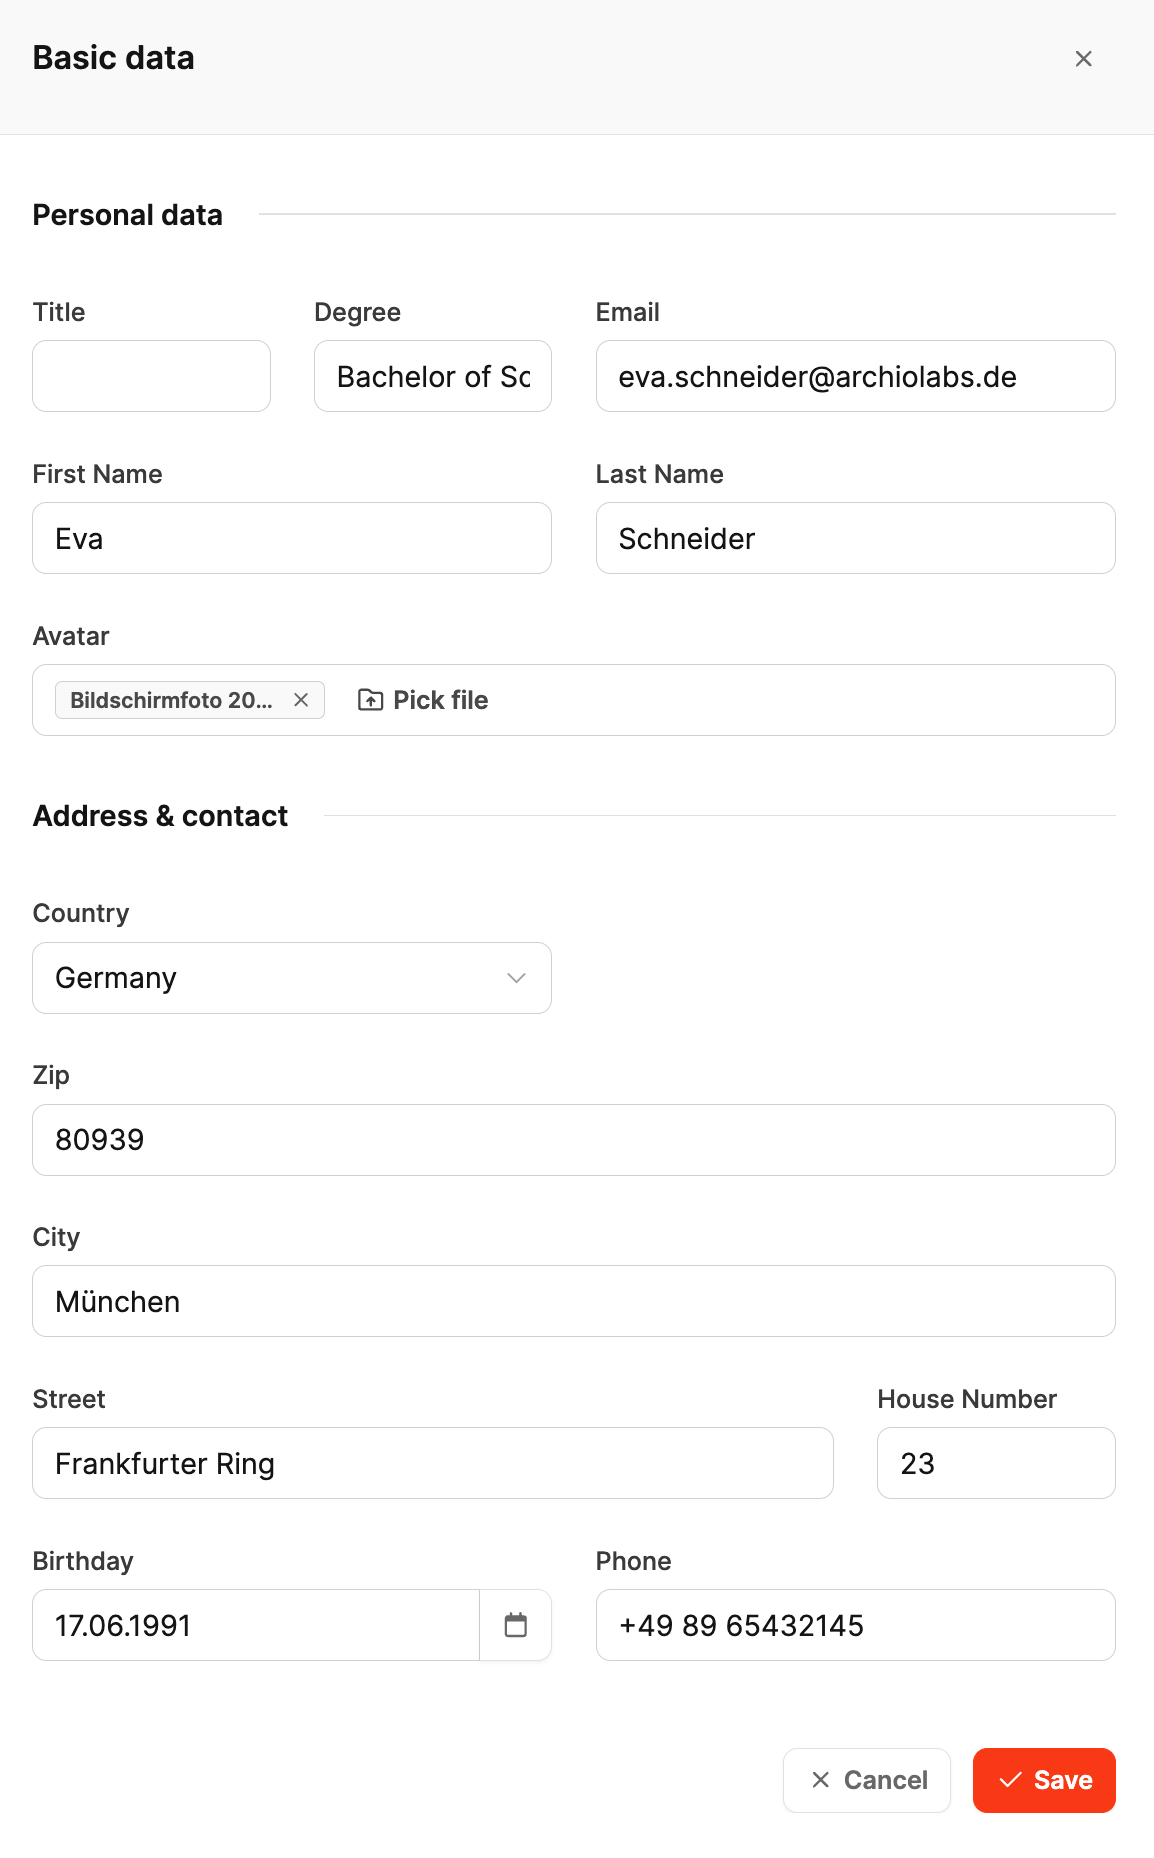
In this section, you enter the employee's basic personal details:
Title: Optional field for academic or professional titles (e.g. Dr., MBA).
Degree: Optional field for highest educational degree (e.g. Bachelor of Science, Master of Arts).
E-mail: The main email address used for internal communication and system access.
First name / Last name: The employee’s full names.
Profile picture (avatar): Using Pick file you can upload or change a photo.
Here you add the employee's contact and address details:
Country: Select via a dropdown menu.
Postal code, city, street, house number: Info for the full home address.
Date of birth: Select via the built-in calendar.
Phone number: Employee's direct phone number.
Save: Applies all changes.
Cancel: Closes the dialog without saving the changes.
The employee can access this data themselves from their profile

The Leadtime Access section controls whether an employee gets access to the Leadtime system and what permissions they get. Open the editing dialog using the pencil icon at the top right.
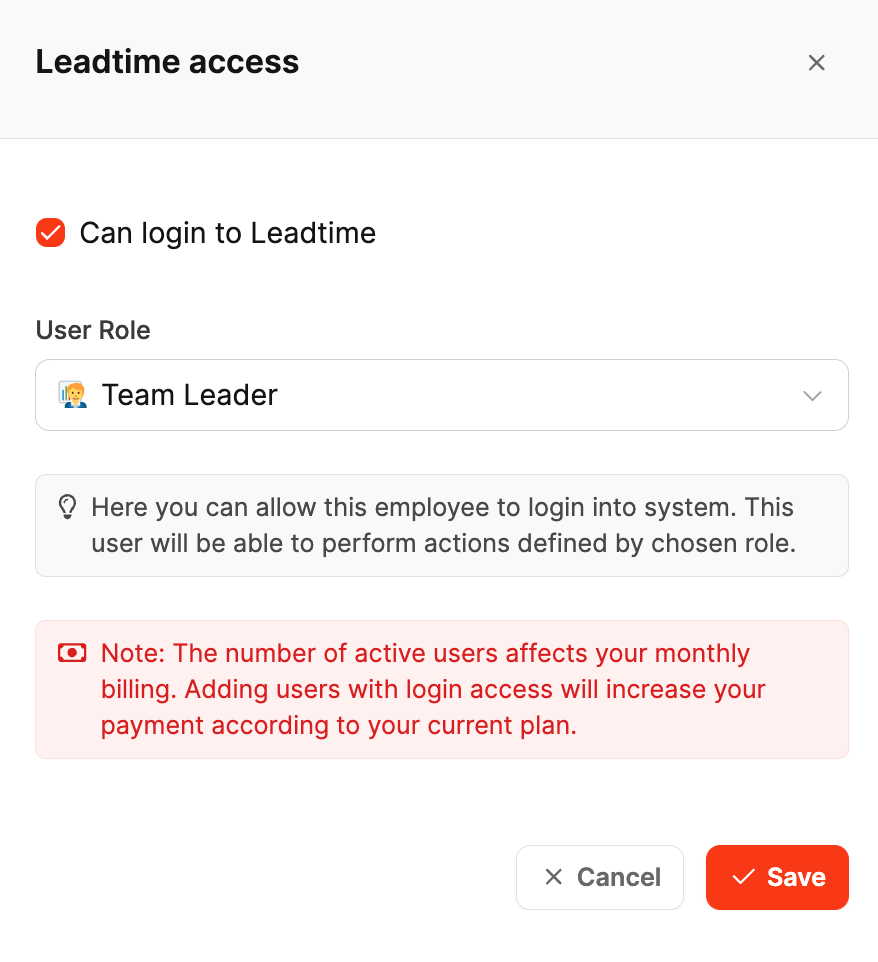
Can log in to Leadtime:
Enable this checkbox to let the employee log into the system. If it's disabled, the employee can't log in.
User role:
Use the dropdown menu to choose the employee's system role. This role defines the permissions and features the employee can access.
A red notice tells you that active users with login access affect your monthly bill. Adding more users can increase the total costs based on your current plan.
Save: Applies all changes.
Cancel: Closes the dialog without applying changes.
Inviting team members to your workspace impacts your subscription.

The Teams section lets you assign one or more teams to a team member. Teams organize how people collaborate in your company and make it easier to assign projects, tasks, and responsibilities.
Teams help you keep your team organized by function, project, or department. One person can be in multiple teams—for example, a project team and a support team.
Open the edit dialog by clicking the pencil icon in the top right.
Here you can configure teams.
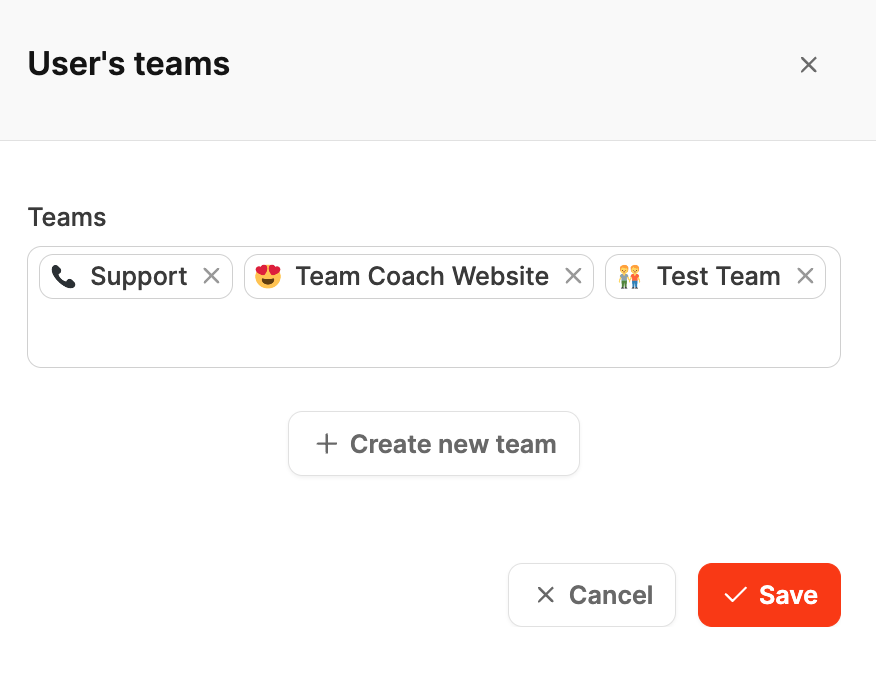
Teams:
Dropdown field to select the existing teams. You can assign several teams to an employee at the same time.
The teams show up as chips with name and icon.
+ Create new team:
If the team you want doesn’t exist yet, you can create it right here with this button. The new team will automatically be added to the selection.
Save: Applies the changes and assigns the selected teams to the employee.
Cancel: Closes the dialog without any changes.
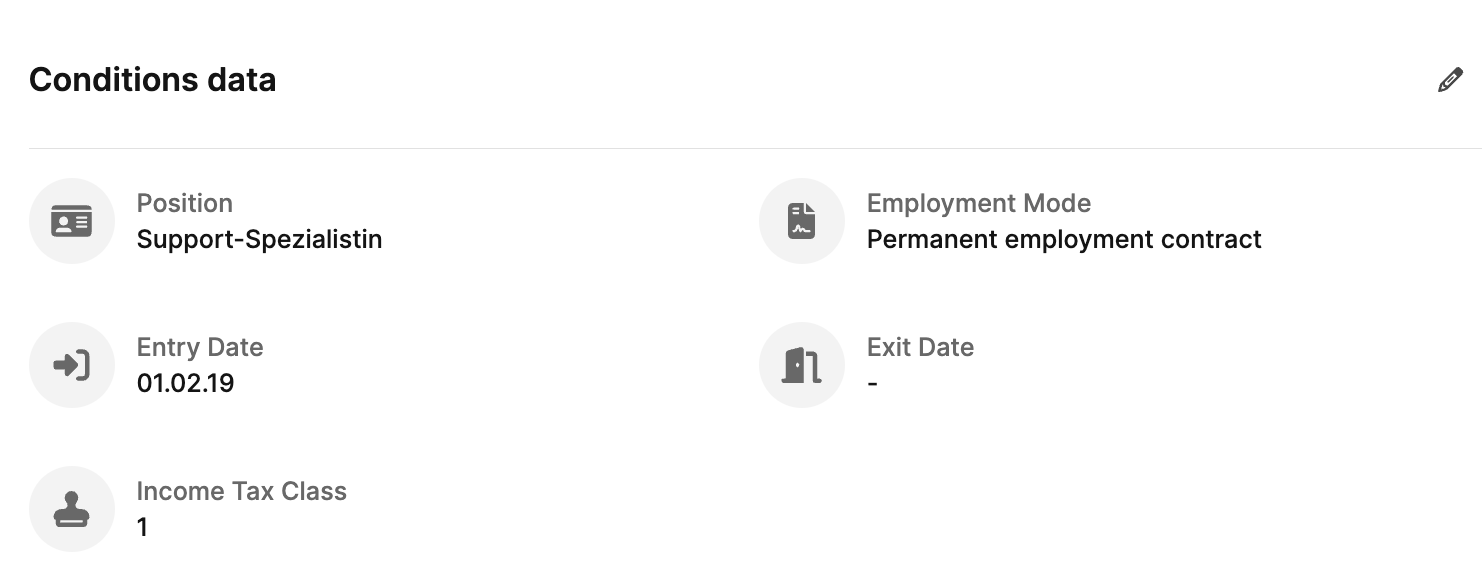
The Collaboration conditions section is for capturing the key employment contract info of an employee – like position, contract type, start and end dates as well as tax details.
This dialog is the foundation for HR and payroll accounting.
Open the editing dialog using the pencil icon in the top right.
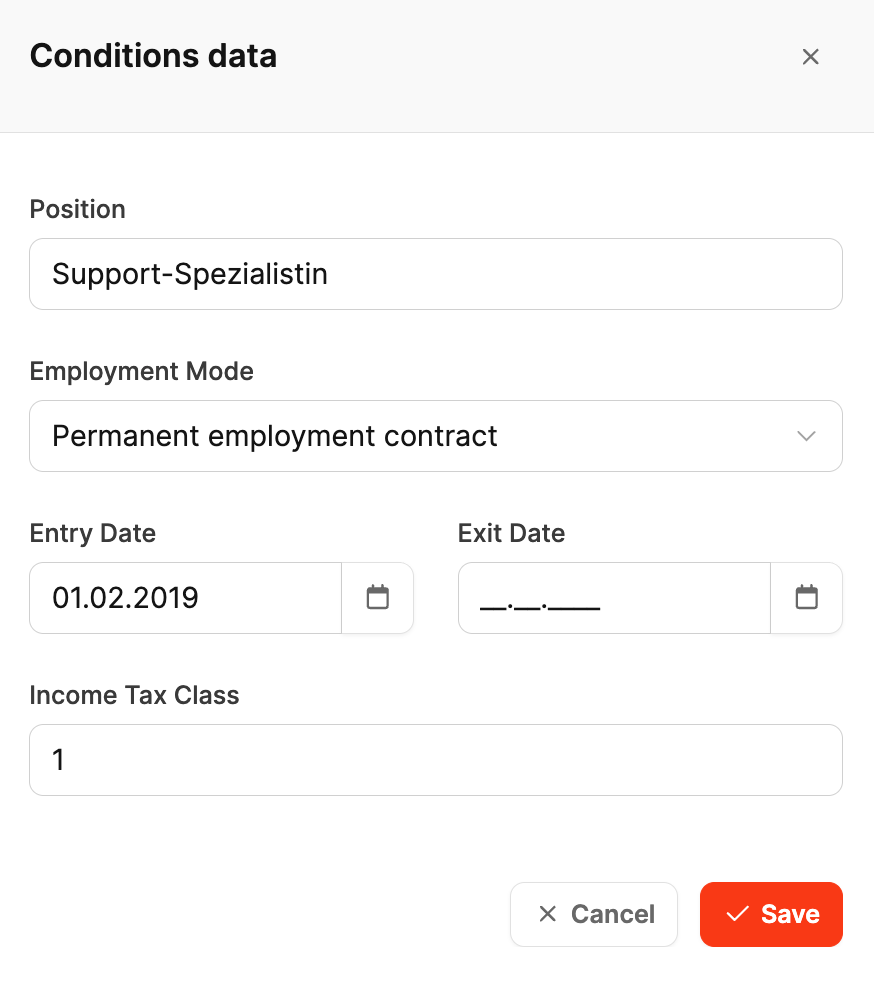
Position:
Free text field to specify the employee's current position in the company.
Examples: Managing Director, Project Manager, Support Specialist, etc.
Type of employment:
Dropdown menu to pick the type of contract. Possible options include:
Permanent employment contract
Fixed-term employment contract
Freelancer
Start date:
Date when the employee started their job. The date can be picked using the calendar button.
End date:
Optional field for the date the employee leaves. If no date is given, the employment is considered active.
Income tax class:
Input field to enter the tax class that's relevant for payroll.
Save: Saves the data you entered or changed.
Cancel: Closes the dialog without saving changes.
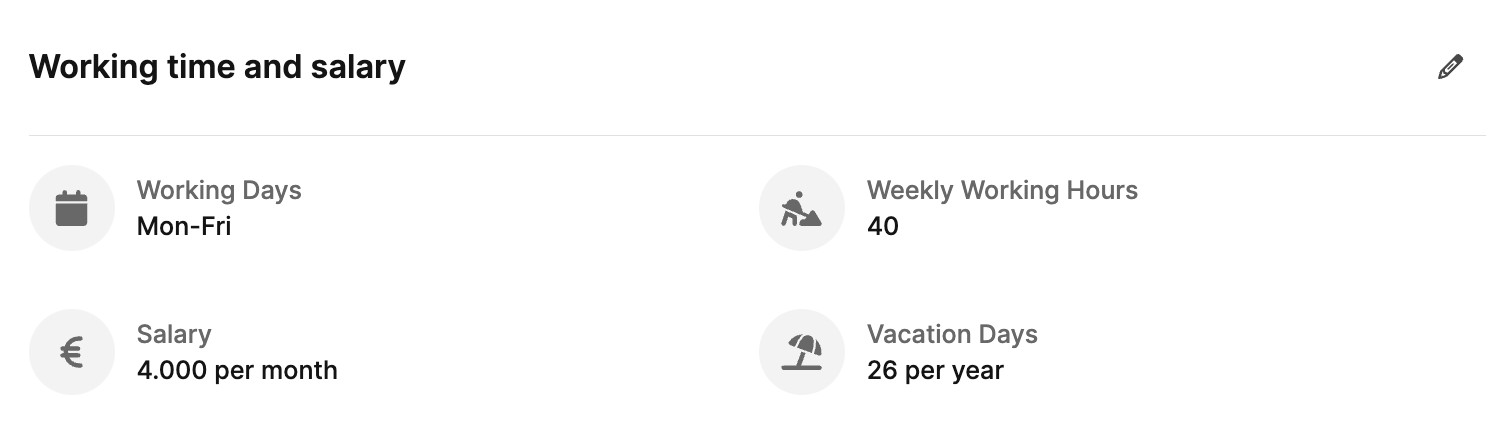
The Working hours and salary section sums up all the info about an employee's work conditions and pay details.
It's split into two tabs: Work conditions and Salary settings.
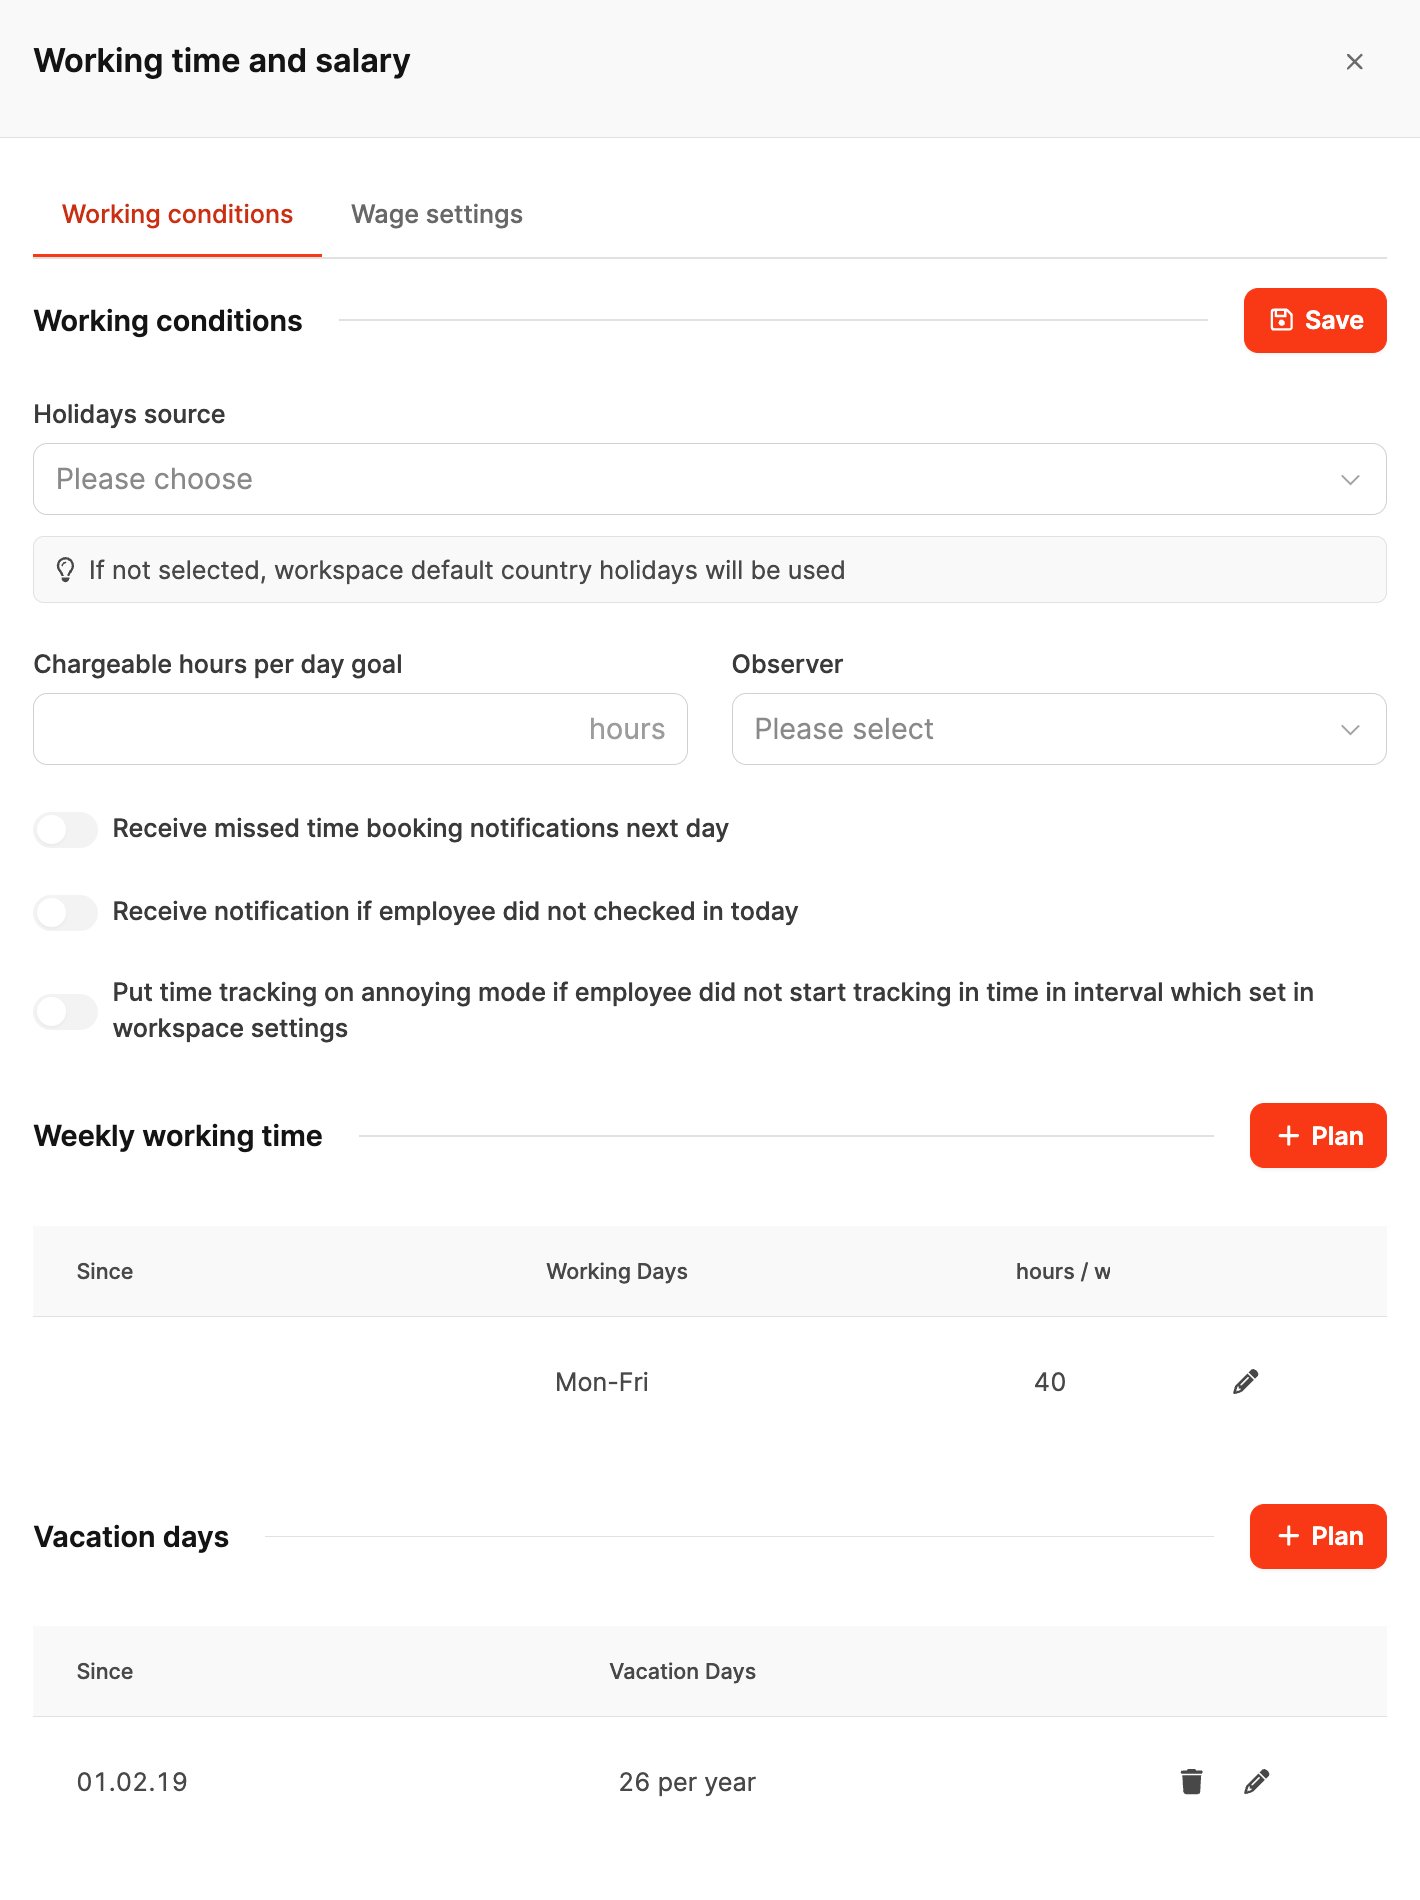
This is where you manage work times, vacation entitlements, and time tracking notifications.

Vacation source:
Selection field where you pick the country or region whose holidays and vacation rules apply to the employee.
More about this here: Holidays
If nothing is selected, the system will automatically use the default holidays of the country defined in the workspace. This comes in handy if you sometimes work with employees who live abroad – so they're not available on the same days as the rest of the team.
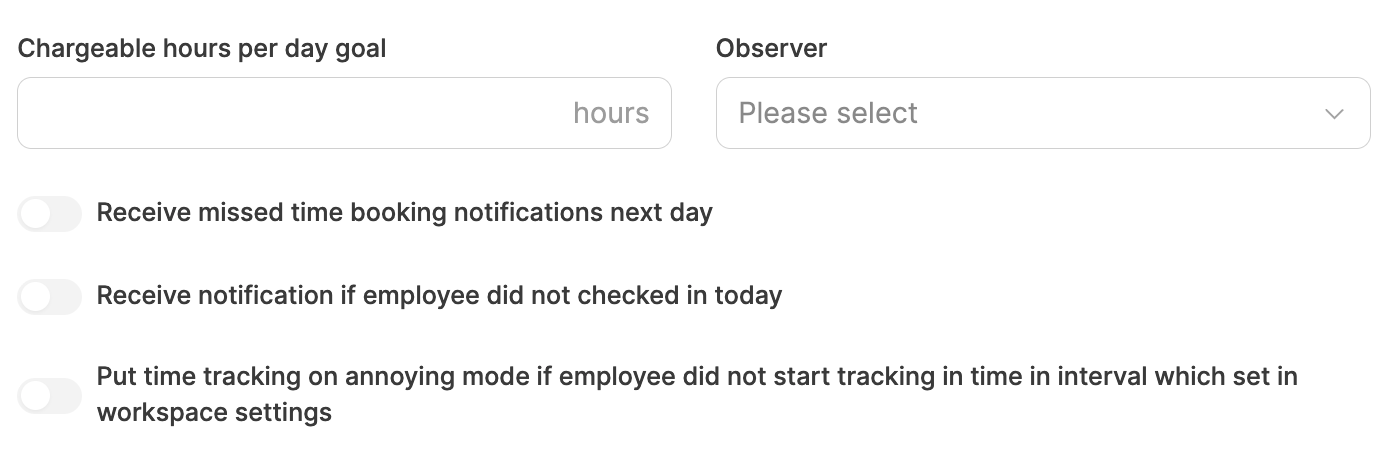
Billable hours per day:
This is where you set the time booking targets for an employee.
Defines how many hours per day count as billable. This number is there for monitoring and checking productivity.
Observer:
Optional assignment of a person (like a team lead) who keeps an eye on this employee's time tracking.
Notifications:
Reminder if no time entry was made the previous day.
Reminder if the employee didn't clock in on a day.
Automatic activation of the annoying mode, if time tracking wasn't started on time.
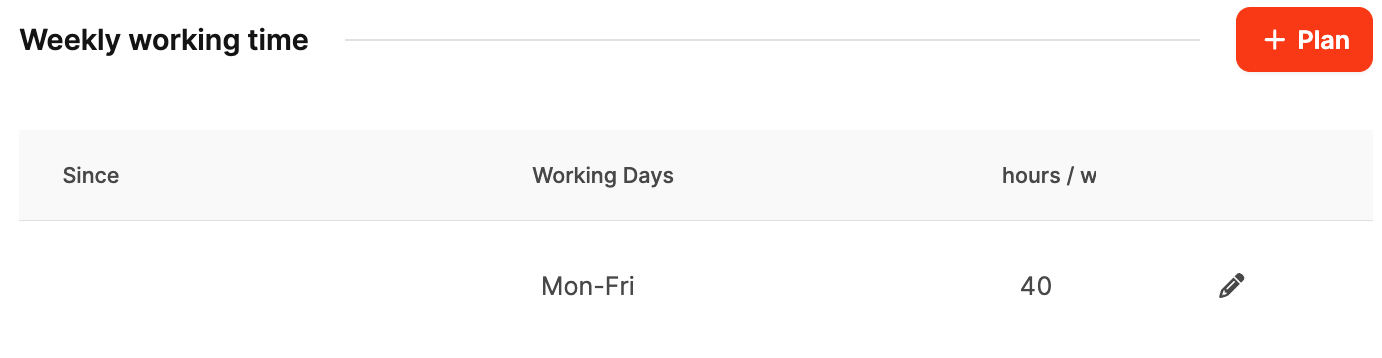
Using the + Plan button, you can define or change the weekly working hours.
You can set different values for each period, for example:
Since: Start date of the rule
Workdays: Set workdays per week (e.g. Monday–Friday)
Hours: Working hours per week
This feature is especially useful if working times change over time — like when hours are reduced, someone's on parental leave, or when switching from a fixed-term to a permanent contract.
All scheduled intervals remain historically traceable and are automatically taken into account, for example in capacity planning, time tracking, and vacation entitlement calculation.
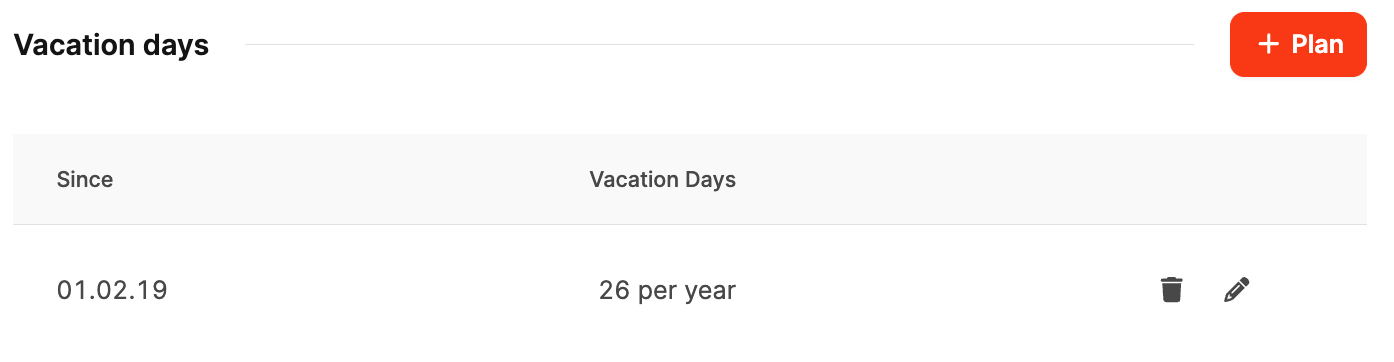
Also plannable via + Plan.
Here the number of annual vacation days is stored, optionally with a start date.
This also lets you reflect changes (e.g. more vacation after company seniority).
Example:
If an employee only works 20 hours a week starting from 2025, a new rule can be created from this date. Leadtime applies this change automatically from the specified date.
Learn more about it here: Vacation management
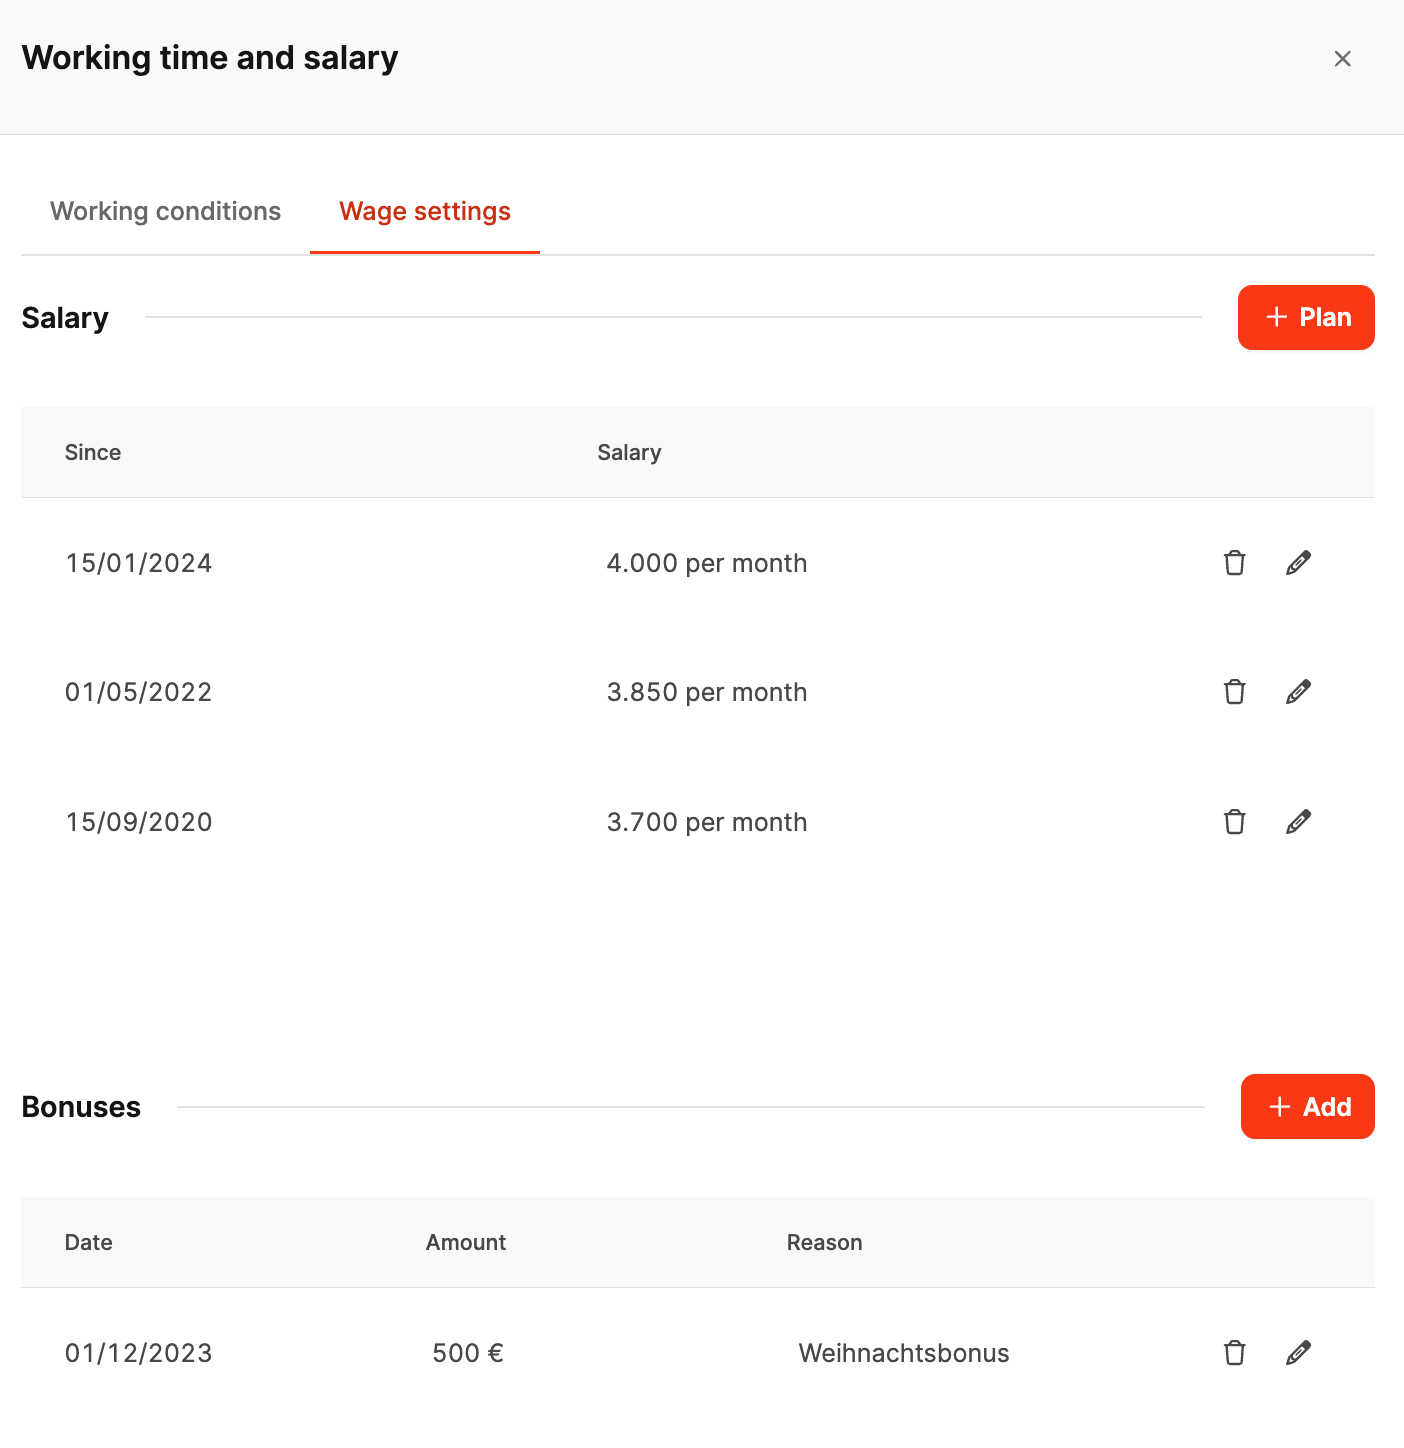
This tab contains all salary data and bonus payments.
Salary:

The Salary settings tab is there to plan agreed salary adjustments in advance and apply them automatically.
Instead of manually adjusting salaries at the right time, you can enter future changes here directly. Leadtime will then update them automatically on the given start date.
This feature makes sure planned salary increases, promotions or contractually agreed adjustments are taken into account on time and correctly – with no extra admin work.
With + Plan you can add new salary intervals.
Since: Salary valid from
Salary: Monthly gross amount
Bonus payments:
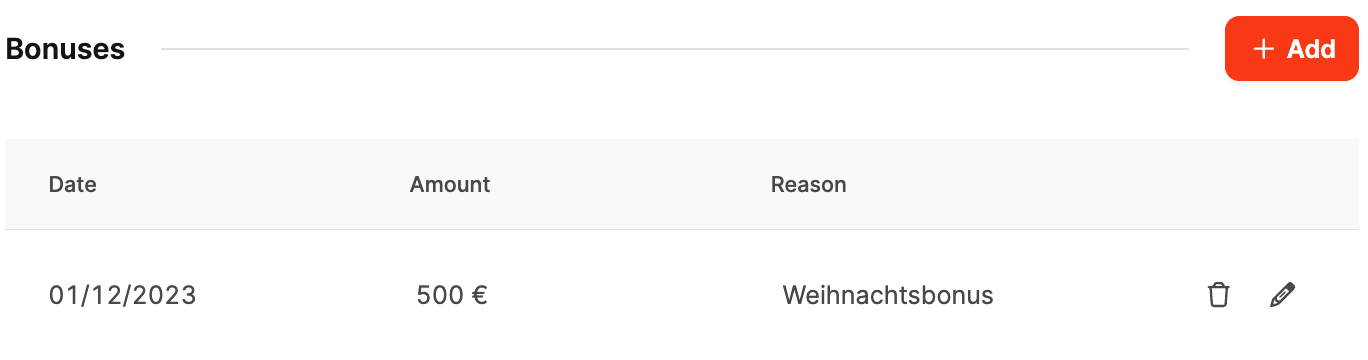
With + Add you can record one-time payments like bonuses or Christmas pay.
Date: Due date
Amount: Payment amount
Reason: Reason or description of the bonus payment
More about payroll here: Employee – Payroll
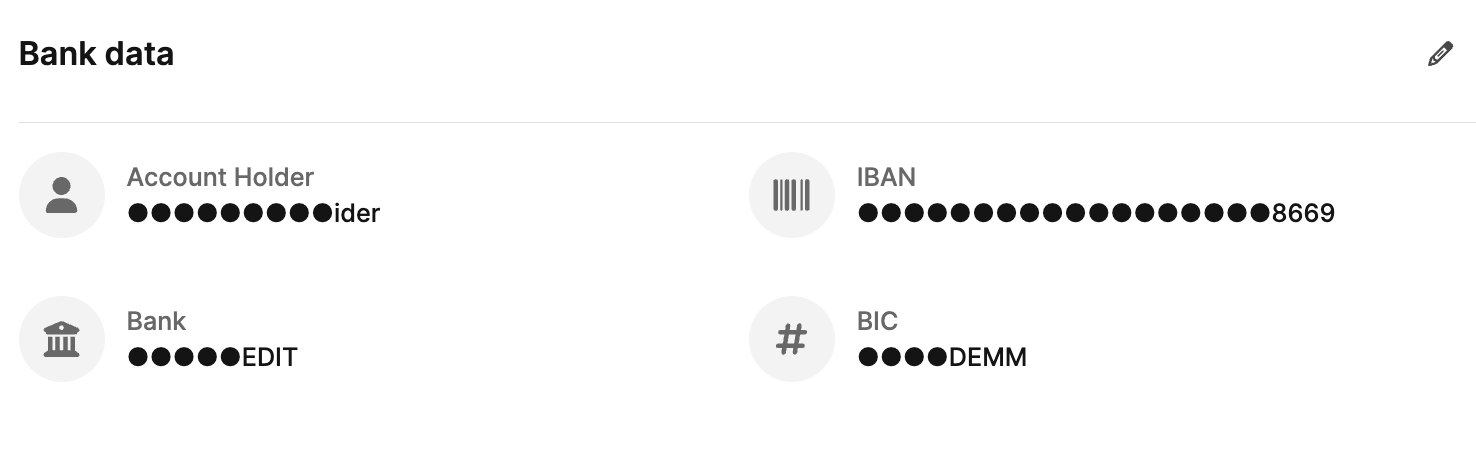
The section Bank details contains all the info needed for salary transfers and other money transactions.
Account holder: Name of the person in whose name the account is held.
IBAN: Employee's International Bank Account Number used for processing the payment.
Bank and BIC: Name of the bank and the associated Bank Identifier Code (BIC), which clearly identifies the financial institution.
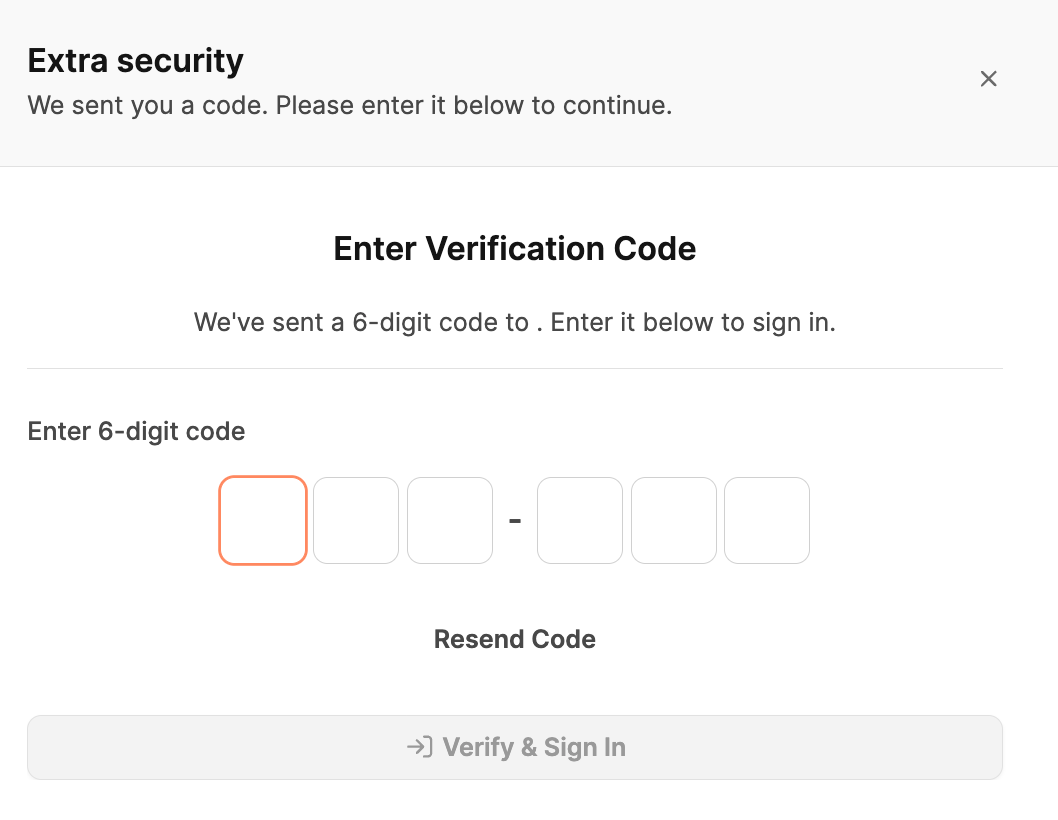
To change bank details, for security reasons an additional verification is required.
After entering a one-time confirmation code (6 digits), which is sent by email, the data can be edited and then saved.
This security measure protects sensitive payment info and makes sure changes can only be done by authorized people.
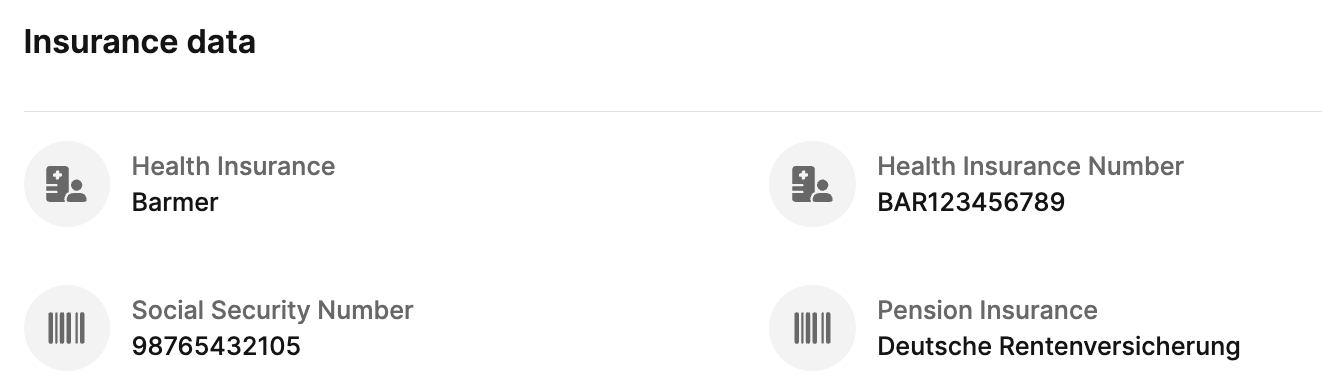
This dialog is for entering and managing an employee's insurance details. Here you can save info about their main social insurances.
Health Insurance: Input field for the name of the health insurance company where the employee is insured.
Health Insurance Number: Input field for the employee's health insurance number.
Social Security Number: Input field for the employee's social security number.
Pension Insurance: Input field for the employee's pension insurance number.
